Leo Emarket
Hướng dẫn sử dụng Leo Emarket cho prestashop 1.6
- Ngày tạo : 26/09/2015
- Lần cuối sửa: 26/09/2015
- Tác giả : Apollotheme
- Email: apollotheme@gmail.com
CẢM ƠN BẠN ĐÃ LỰA CHỌN SẢN PHẨM CỦA CHÚNG TÔI!
Dưới đây là các bước cơ bản để cài đặt, cấu hình và tùy chỉnh ApolloTheme.
Giới thiệu về ApolloTheme TeamApollotheme Team là nhóm bao gồm các nhà phát triển website , coder chuyên nghiệp và các nhà thiết kế xuất sắc với nhiều năm kinh nghiệm trong lĩnh vực xây dựng giao diện website . Mỗi một trang web chúng tôi làm với tất cả tâm huyết, chăm chút dù là chi tiết nhỏ để bạn có thể sở hữu 1 website với đầy đủ những tính năng như : code chuẩn , tối ưu hoá cho SEO , framework mạnh mẽ , tuỳ chỉnh dễ dàng và thiết kế hiện đại , độc đáo.
Ngoài ra chúng tôi còn cung cấp các dịch vụ custom work dành cho những khách hàng sau khi mua giao diện.
1. Dịch vụ sửa đổi giao diện
2. Dịch vụ tạo những app chuyên biệt dành cho bán hàng
3. Dịch vụ thiết kế giao diện từ ý tưởng của bạn
4. Dịch vụ bảo trì website theo tháng
5. Tư vấn tìm giải pháp xây dựng website
6. Kinh Doanh hợp tác bán hàng
Nếu bạn muốn sử dụng dịch vụ của chúng tôi , xin vui lòng liên hệ với Mr Trần Định Nghĩa - 0987822810
Email: nghiatd@brainos.vn - apollotheme@gmail.com.
Skype: trandinhnghiait
Website: apollotheme.com, cungdepxinh.com
Chúng tôi sẽ hồi âm cho bạn nhanh nhất có thể.
Apollotheme Team đang làm việc quyết tâm , chăm chỉ ,nỗ lực hết sức có thể để mang lại sự hài lòng cao nhất tới bạn.
ApollothemeTeam
Hướng dẫn sử dụng Prestashop
Nếu bạn chưa từng sử dụng PrestaShop trước đây, hãy xem hướng dẫn sử dụng PrestaShop:
http://doc.prestashop.com/display/PS16/Getting+Started
Cài đặt gói QuickStart
Mỗi gói giao diện mà bạn tải về từ ApolloTheme sẽ bao gồm: gói quickstart, gói giao diện, bản PSD. Nếu bạn có ý tưởng xây dựng website bán hàng từ đầu, hãy tải tập tin quickstart.
Các bước để cài đặt QuickStart
- Tải tập tin QuickStart
- Giải nén tập tin vào trong host của bạn
- Cài đặt như tập tin prestashop mặc định
Chú ý : tất cả các bước đã được miêu tả chi tiết trong video dưới đây.
Cài đặt giao diện
Nếu bạn đã có một cửa hàng, hãy làm theo các bước dưới đây
Các bước cài đặt giao diện Prestashop
- Đến Back end và đăng nhập, di chuyển đến: Tuỳ chọn> Giao diện > Thêm giao diện mới
- Ở bước này, bạn có thể cài đặt giao diện theo 2 cách sau:
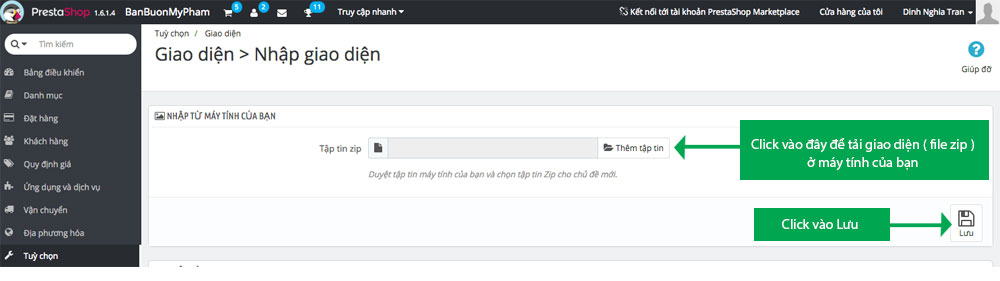
- Đăng tải tập tin từ máy tính: Thêm tập tin: Import từ máy tính của bạn > Chọn tập tin > Click Tiếp theo . Nếu gặp lỗi ở bước này, bạn có thể sử dụng cách thứ 2
-
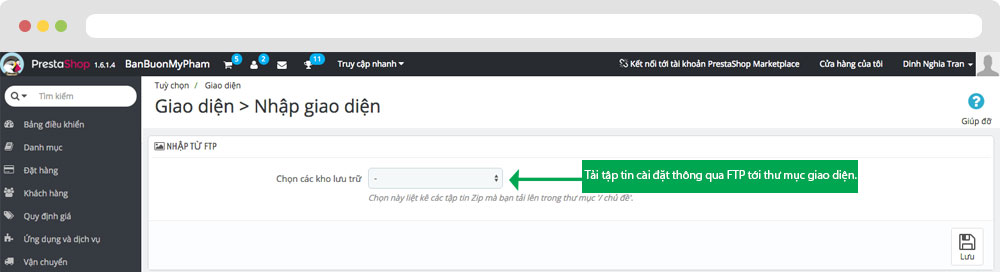
Đăng tải tập tin tới thư mục của bạn ở trong live site thông qua FTP client. Sau đó đăng tập tin zip của giao diện vào thư mục: ROOT/themes/theme.zip, rồi khởi động lại trình duyệt,
tập tin zip sẽ được hiển thị trong danh sách dropdown của box Import từ FTP, Chọn tập tin giao diện và chọn next
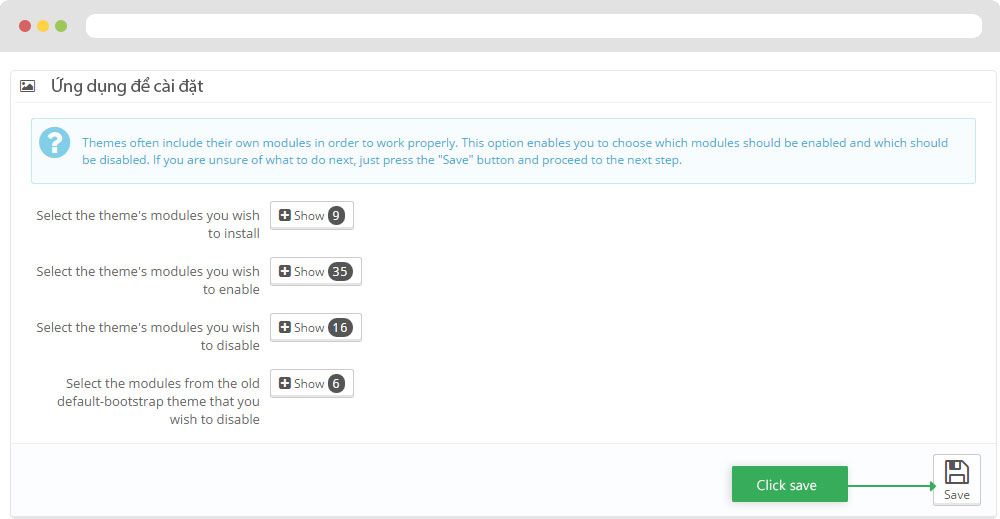
- Tiếp tục chọn Tiếp theo cho đến khi Hoàn thành
Chú ý: Hãy ghi chú lại tất cả các bước đã được miêu tả trong video
1. Cài đặt theo video hướng dẫn
2. Cài đặt theo hình ảnh demo
- Back end > Tuỳ chỉnh > Giao diện > Thêm giao diện mới

- Bạn có thể đưa các giao diệnvào từ máy tính
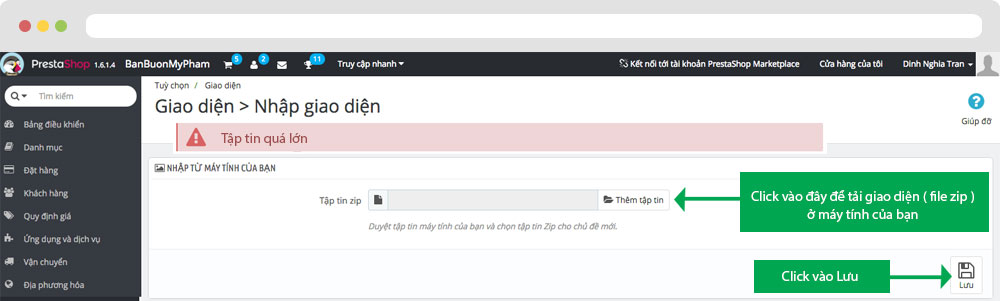
+ Nếu bạn gặp lỗi tập tin quá lớn, hãy làm theo hướng dẫn của chúng tôi
- Bên cạnh đó, bạn có thể đưa giao diện vào thư mục giao diện thông qua FTP themes form FTP
- Sau đó lựa chọn một giao diện cho cửa hàng
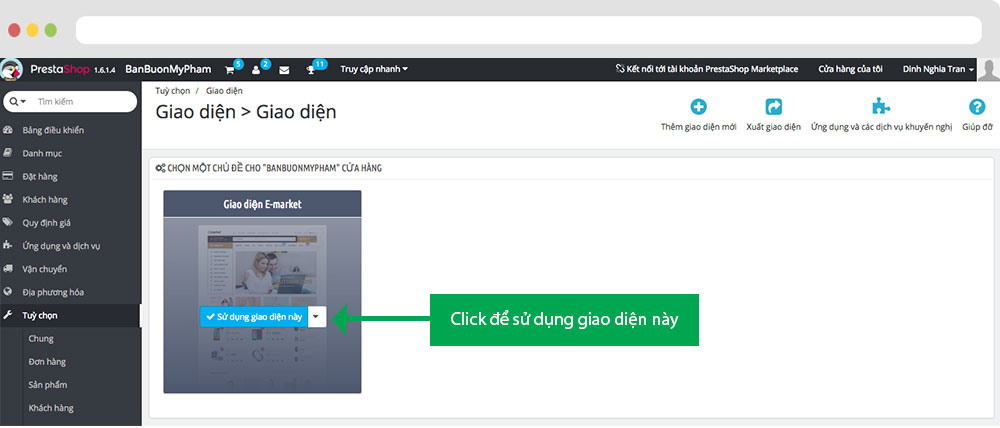
-
Lựa chọn giao diện mặc định và cấu hình sẽ được hiển thị ở cột trái hoặc cột phải tùy theo từng trang
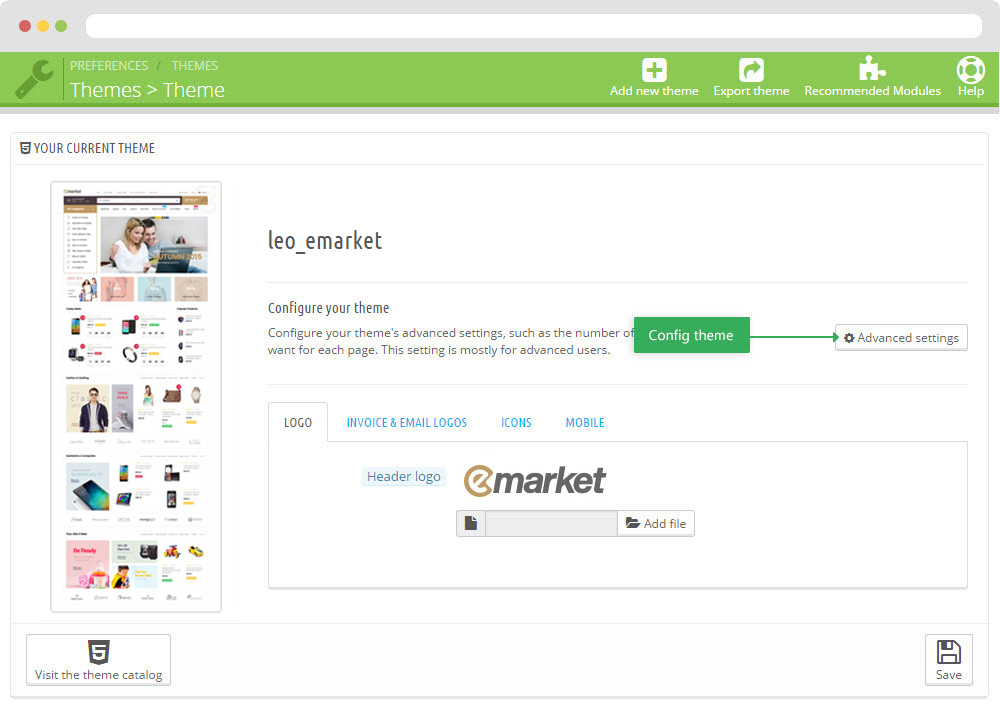
- Tạo mới hoặc chính sửa kích cỡ hình ảnh và tái tạo lại thumbnails trong bước 5
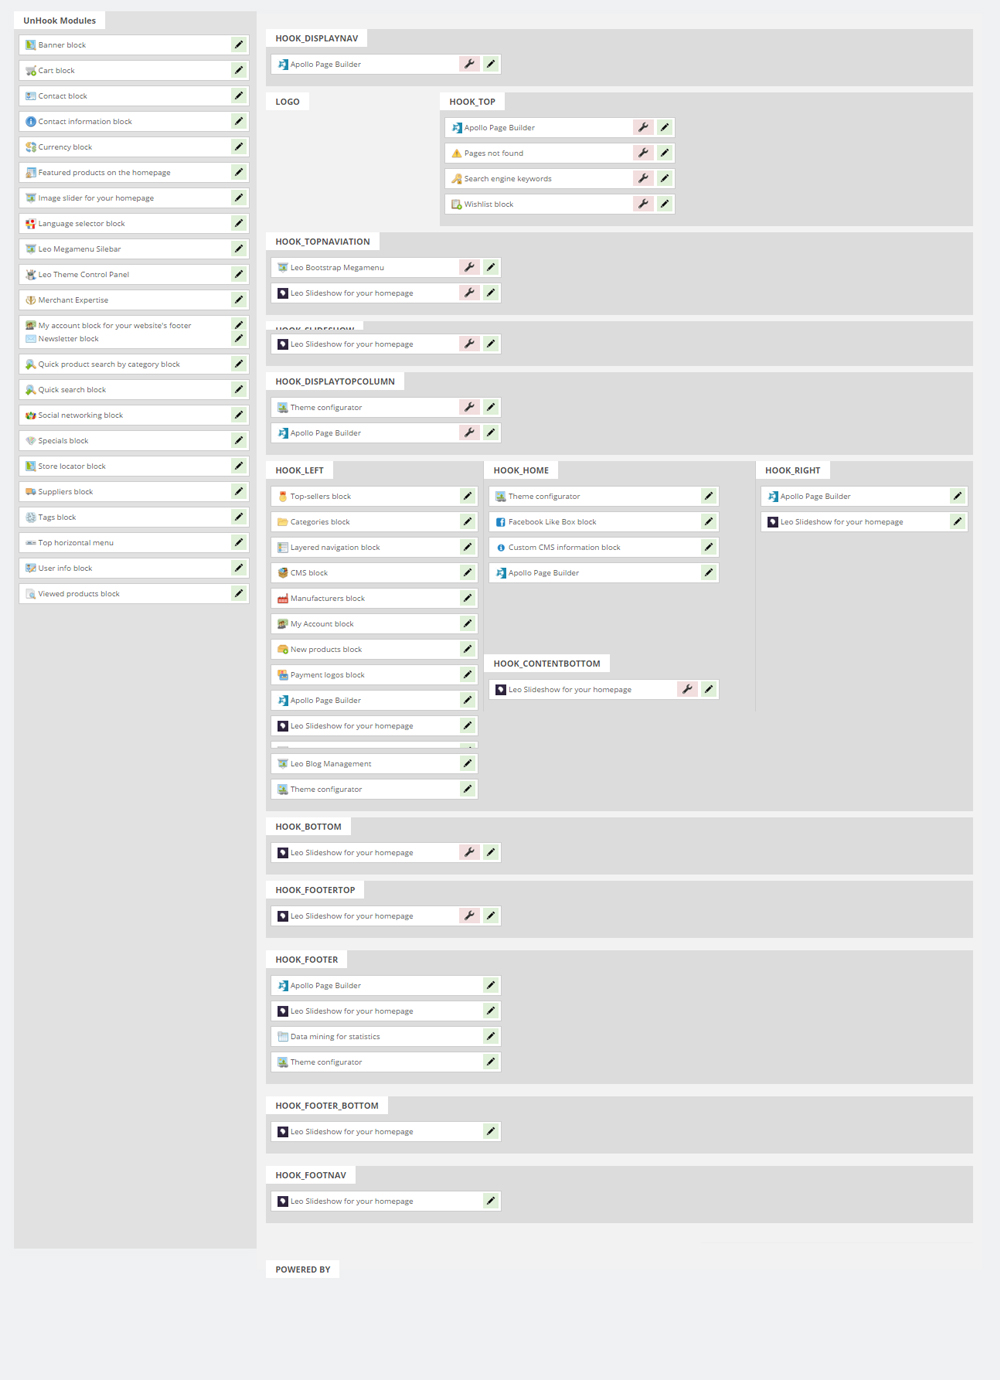
- Kiểm tra lại vị trí module ở trong Ứng dụng > Bảng điều khiển Leo Positions
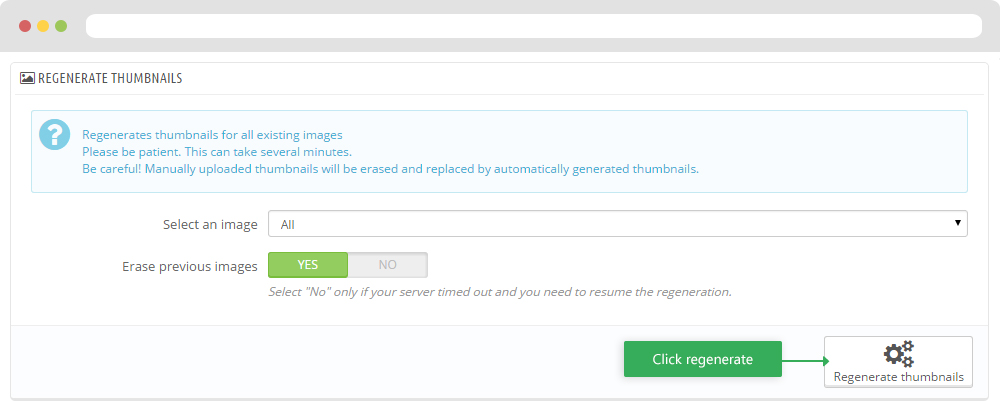
5. Tạo mới hoặc chính sửa kích cỡ hình ảnh và tái tạo lại thumbnails
Back end > Tuỳ chỉnh > Hình ảnh
+ Tạo mới hoặc chỉnh sửa kích thước hình ảnh
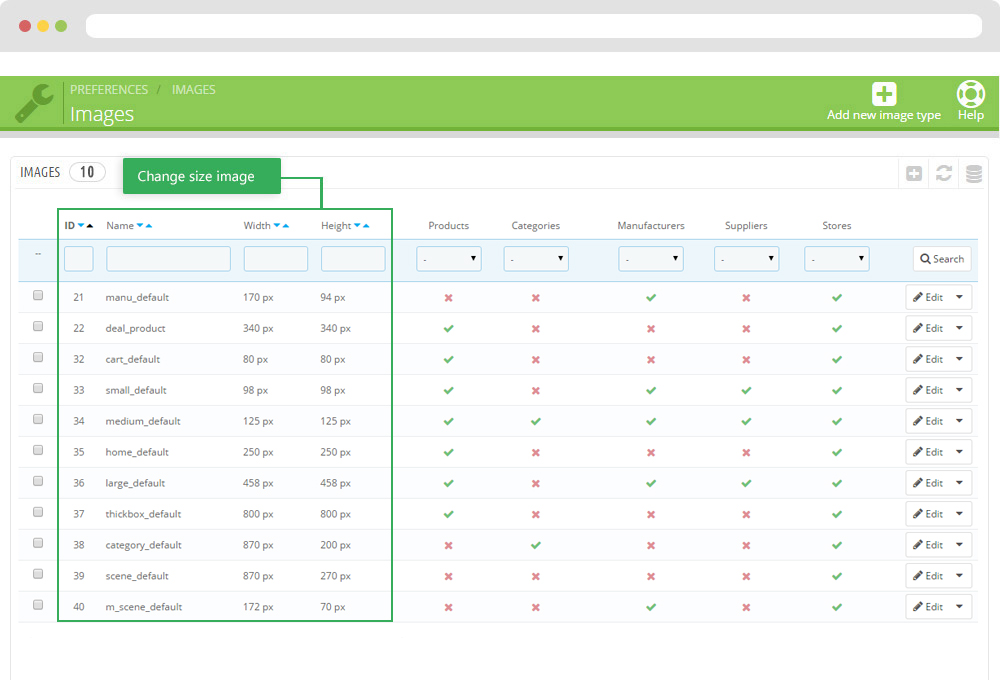
+ Tái tạo lại thumbnails
Bảng điều khiển Leo Theme
Chi tiết hướng đẫn sử dụng ở link bên cạnh (Hướng dẫn Blog )
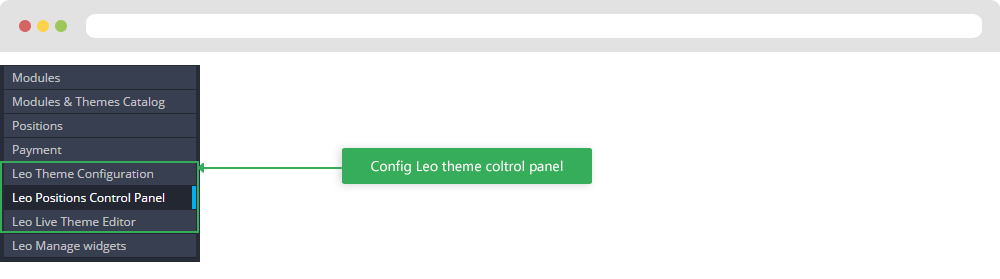
I. Back end > Ứng dụng và dịch vụ > Tuỳ chỉnh Leo Theme
-
Cài đặt chung
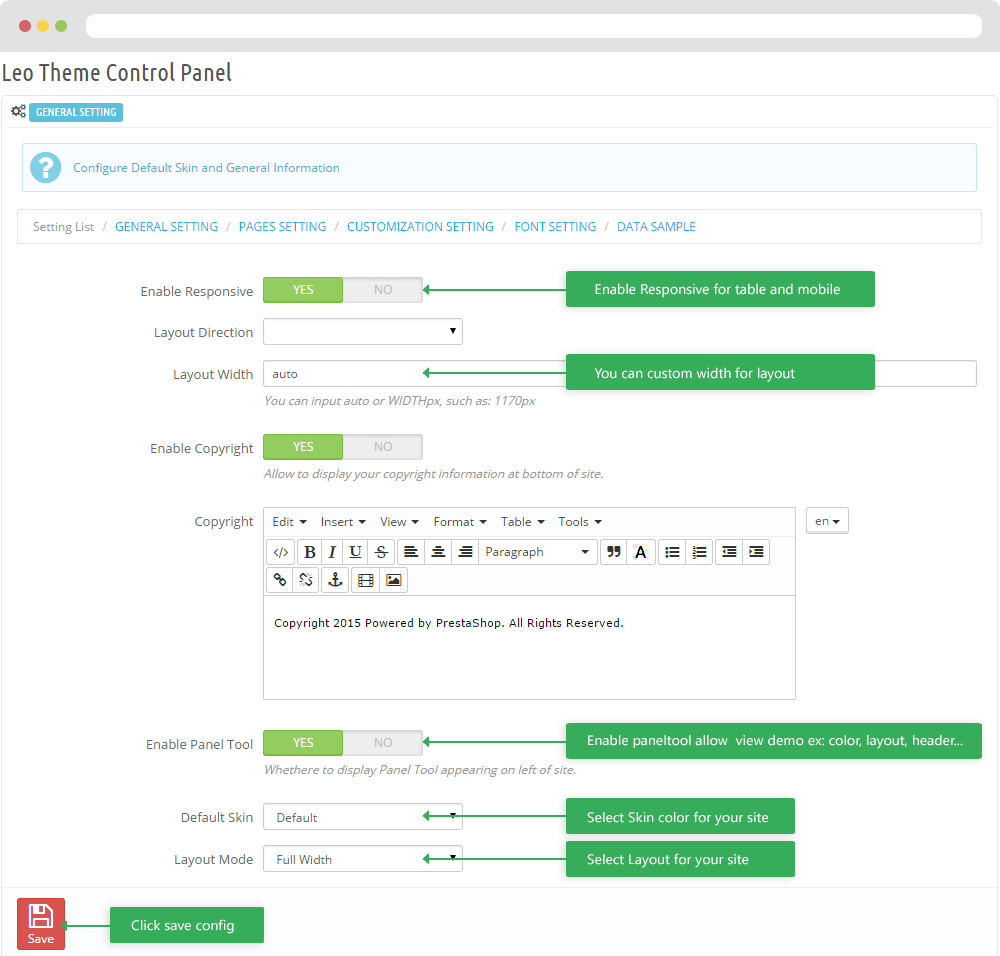
-
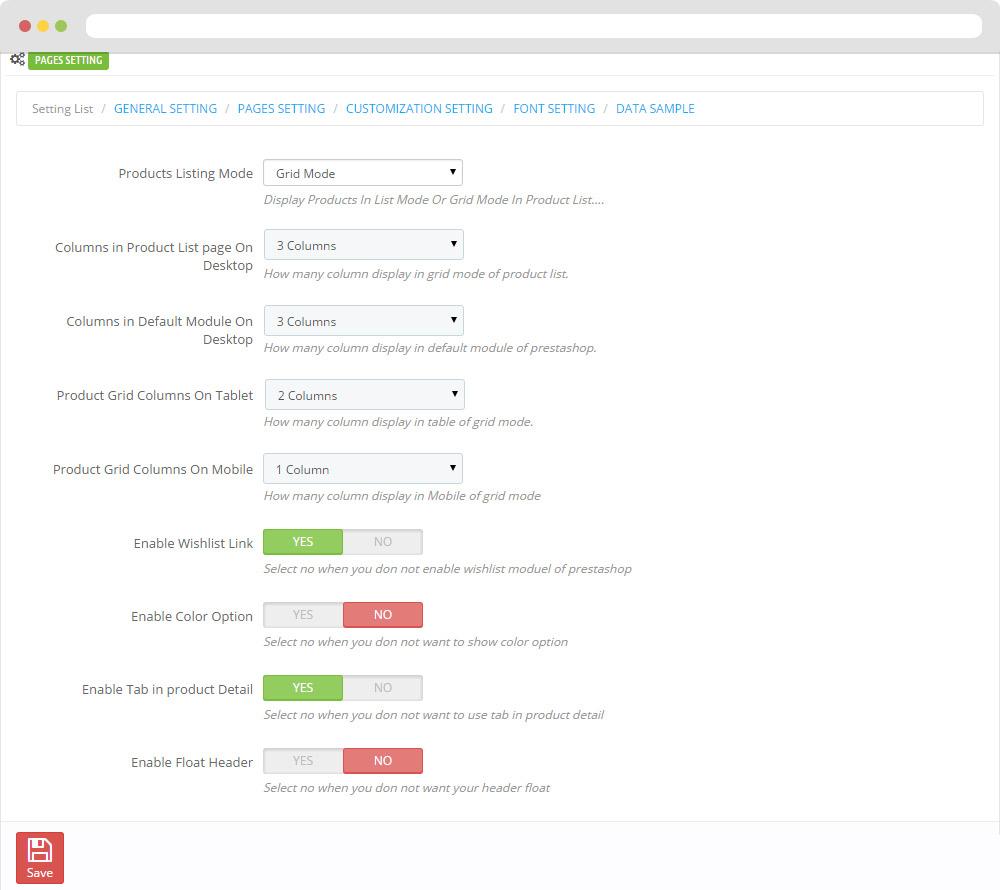
Cài đặt trang
-
cài đặt tùy chọn
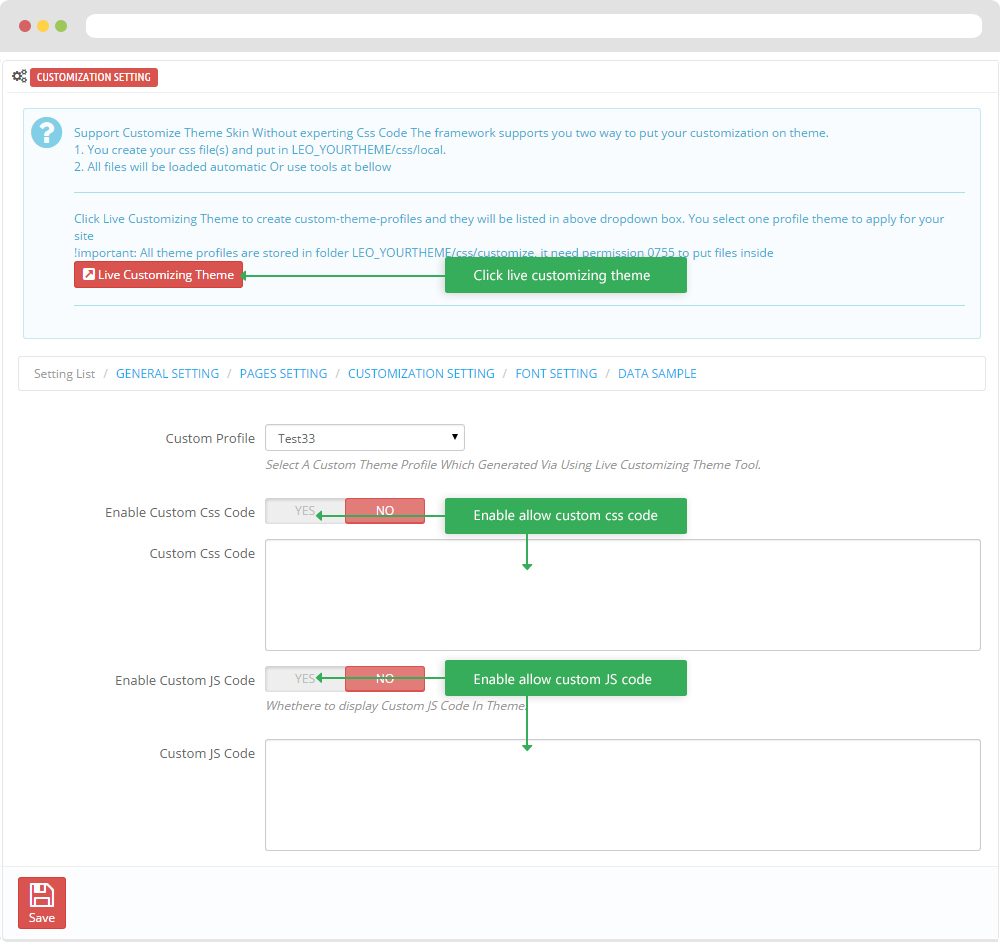
-
Cai đặt font chữ
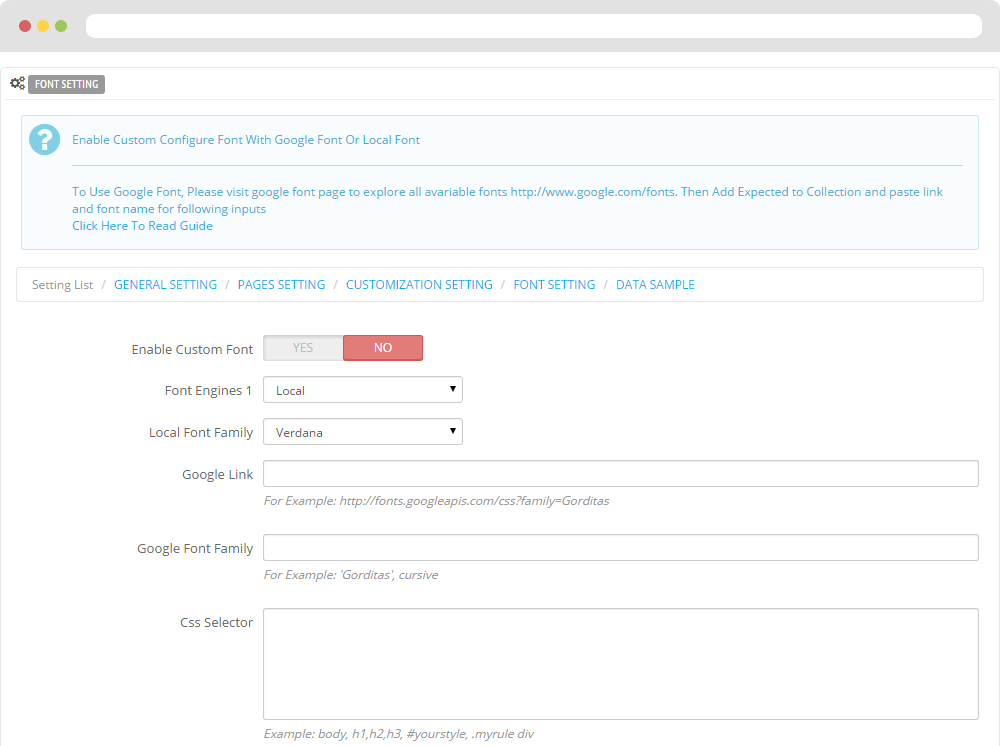
-
Dữ liệu mẫu

II. Back end > Ứng dụng và dịch vụ > Ap Position Control Panel
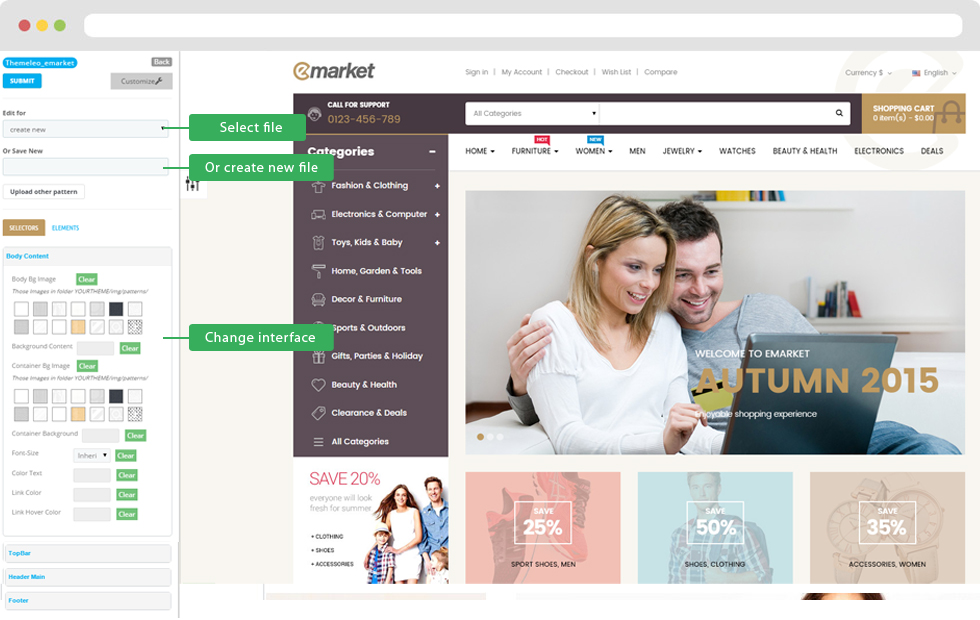
III. Backend > Ứng dụng và dịch vụ > Ap Live Theme Editor
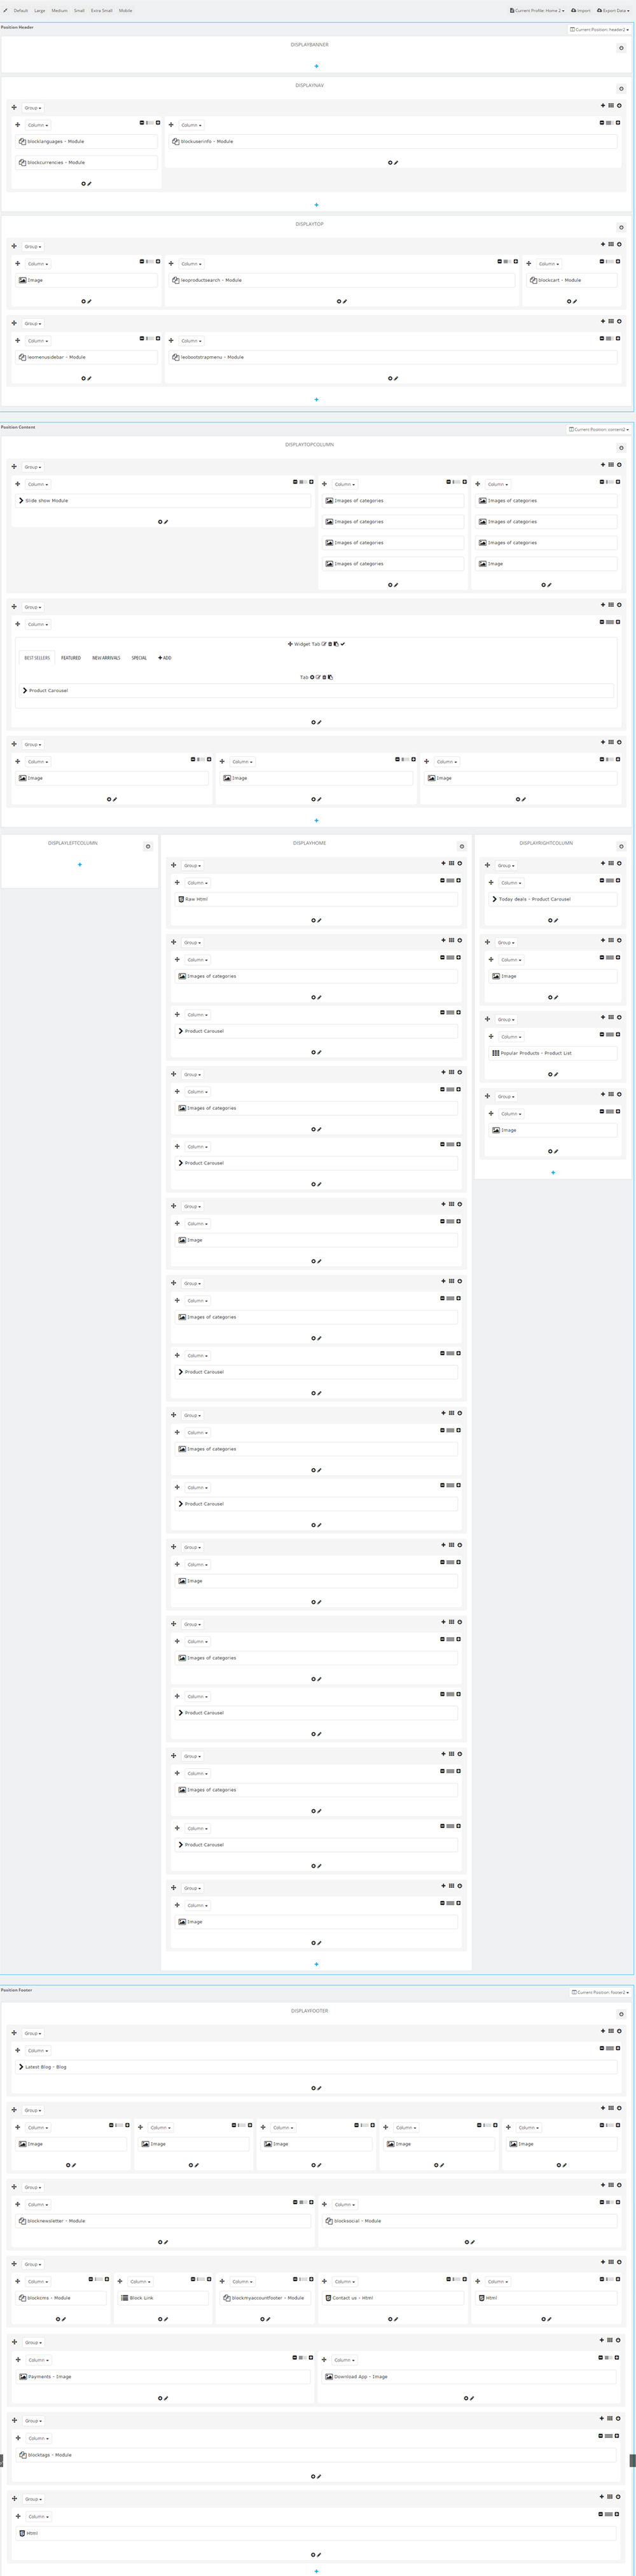
Back end
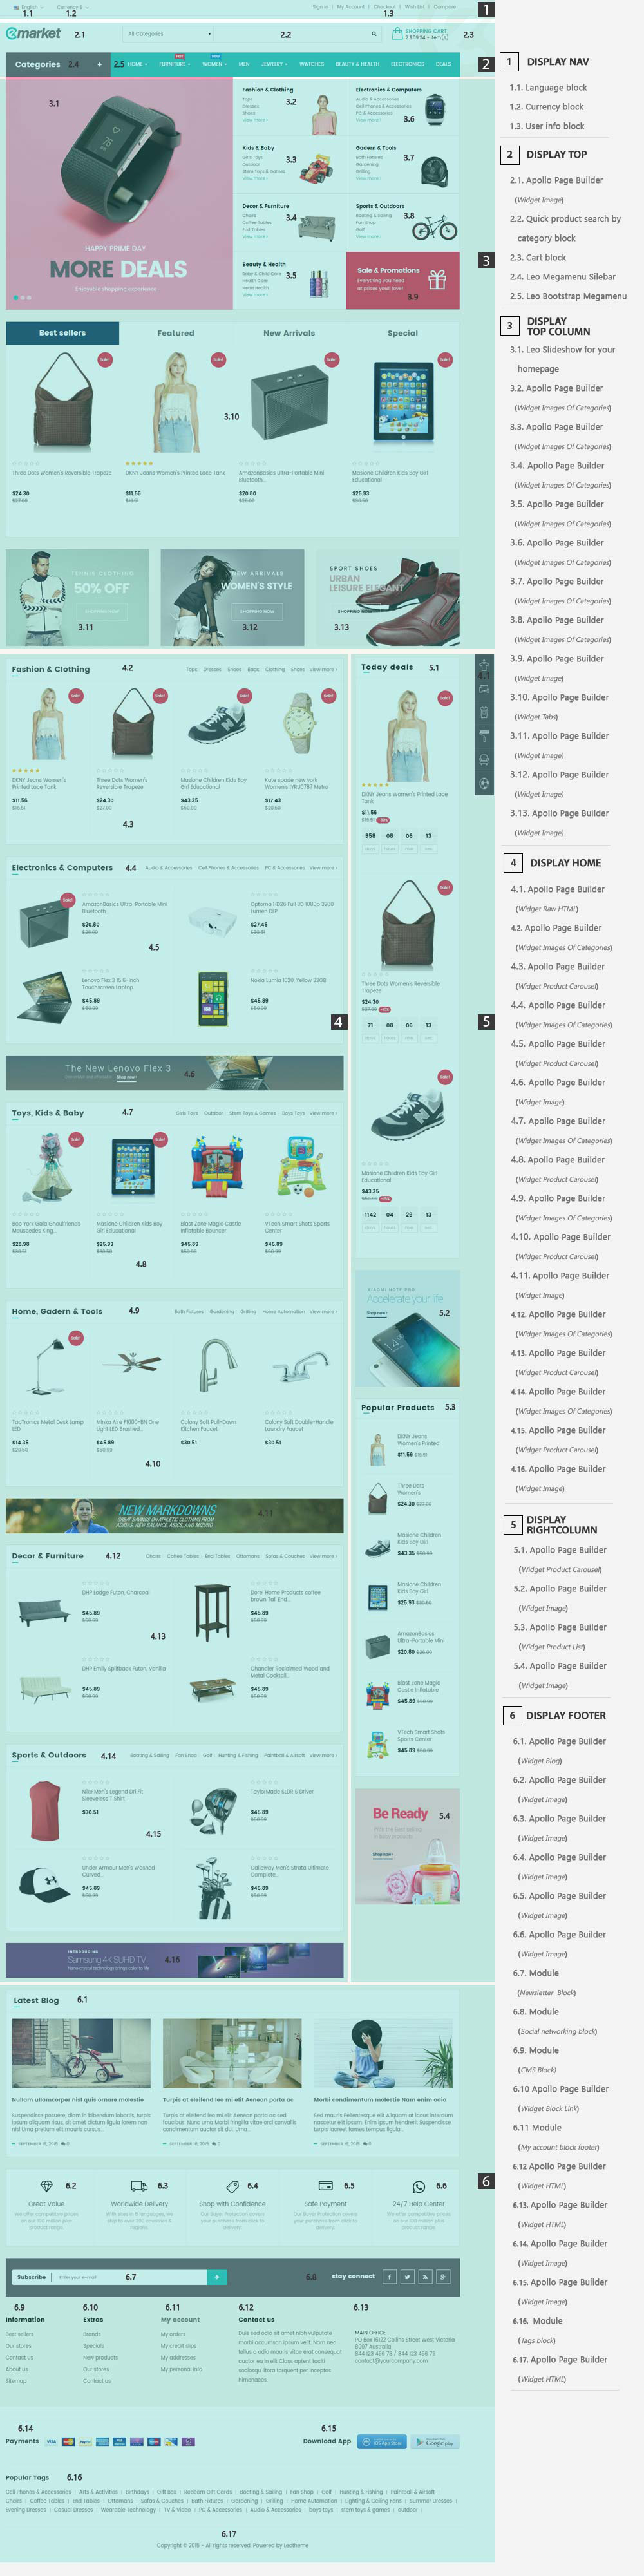
Cấu trúc Layout

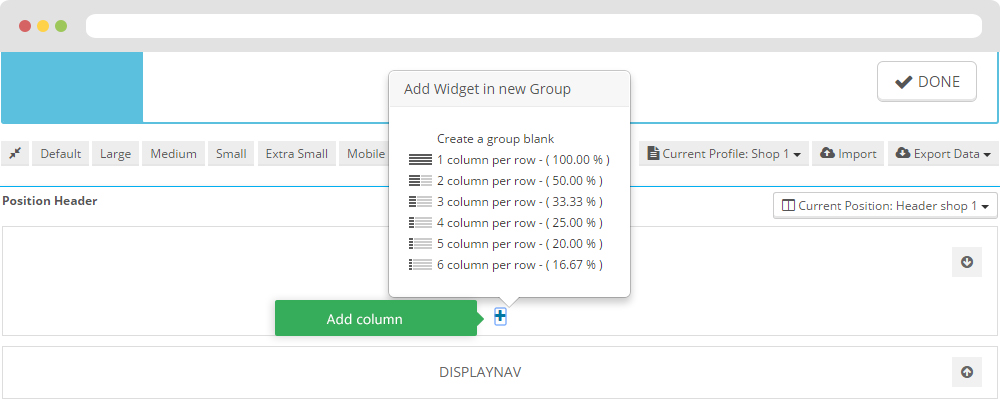
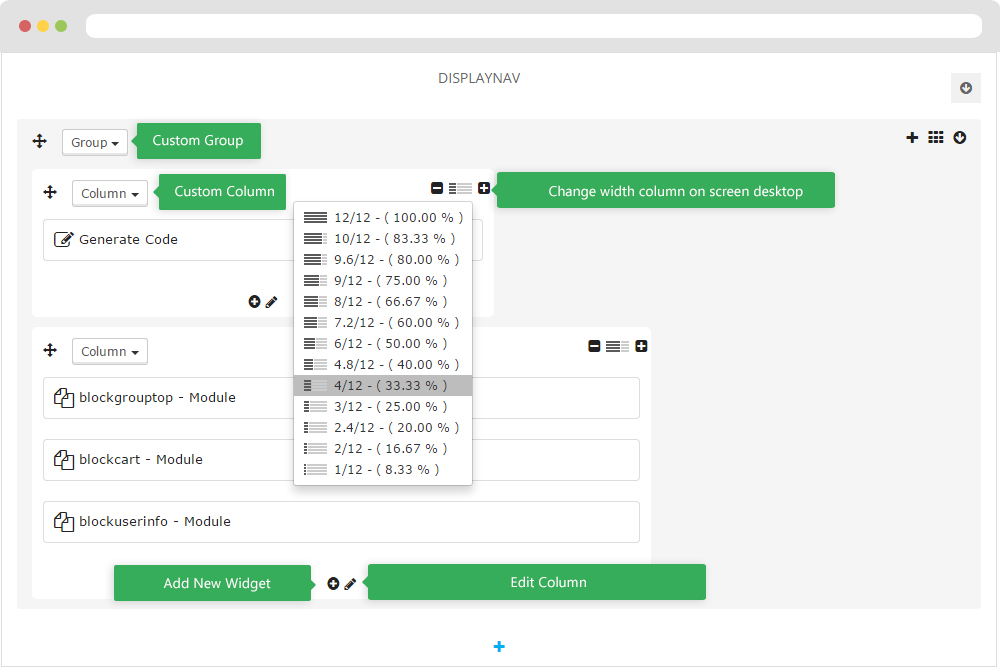
1. Hiện thị Nav
- Front End
- Cấu hình cho Apollo Page Builder ( Backend > Ap PageBuilder > Ap Profiles Manage --> Chọn Home 1 --> Xem)

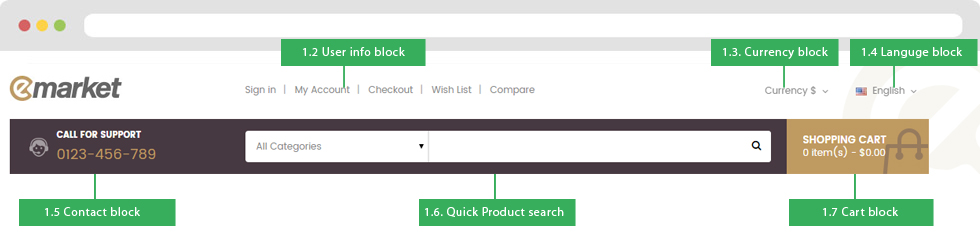
1.2 Ứng dụng Block thông tin khách hàng
Configure User info block( Backend > Ứng dụng > User info block )
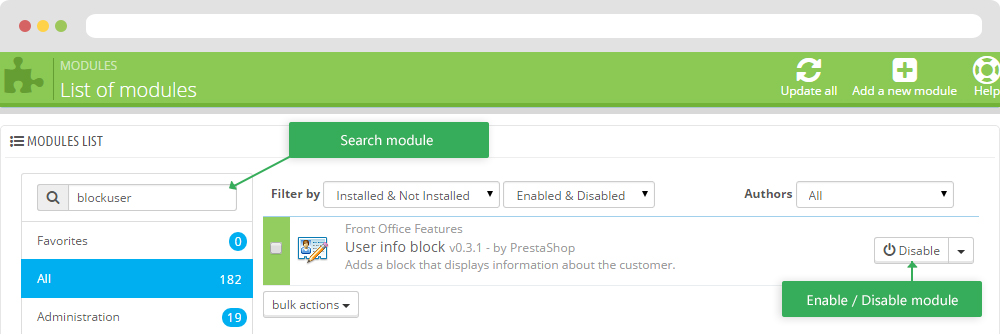
+ You can edit "nav.tpl" at: \themes\PROJECT_NAME\modules\blockuserinfo\nav.tpl
1.3 Module Currency block (Backend > Modules > Currency block)
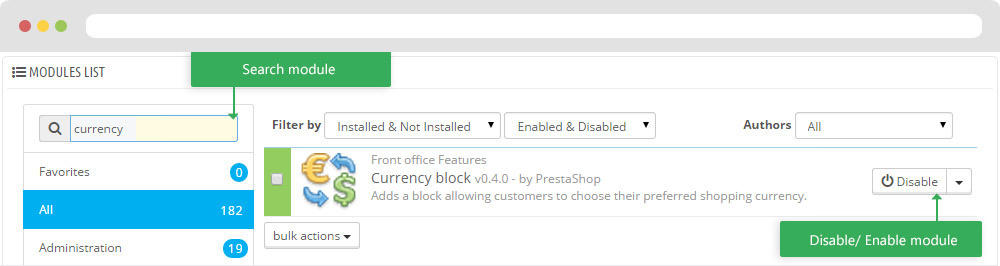
+ You can edit "blockcurrencies.tpl" at: \themes\PROJECT_NAME\modules\blockcurrencies\blockcurrencies.tpl
1.4 Module Language block (Backend > Modules > Language block)
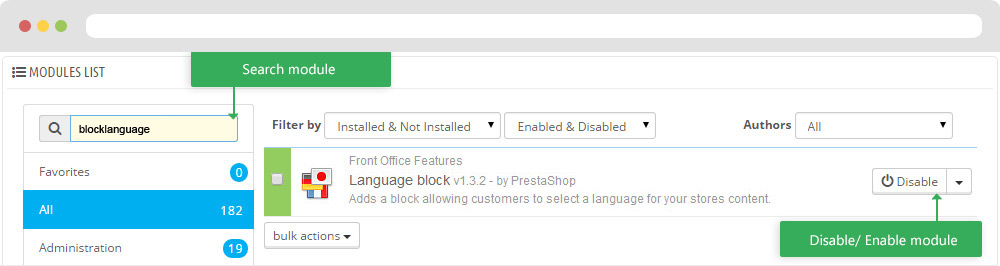
+ You can edit "blocklanguages.tpl" at: \themes\PROJECT_NAME\modules\blocklanguages\blocklanguages.tpl
1.7 Module Cart block (Backend > Modules > Cart block)

+ You can edit "blocklanguages.tpl" at: \themes\PROJECT_NAME\modules\blockcart\blockcart.tpl
1.7 Module Quick Product Search (Backend > Modules > Quick product search by category block )

+ You can edit "blocklanguages.tpl" at: \themes\PROJECT_NAME\modules\blocklanguages\blocklanguages.tpl
1.7 Module Contact block (Backend > Modules > Contact block)
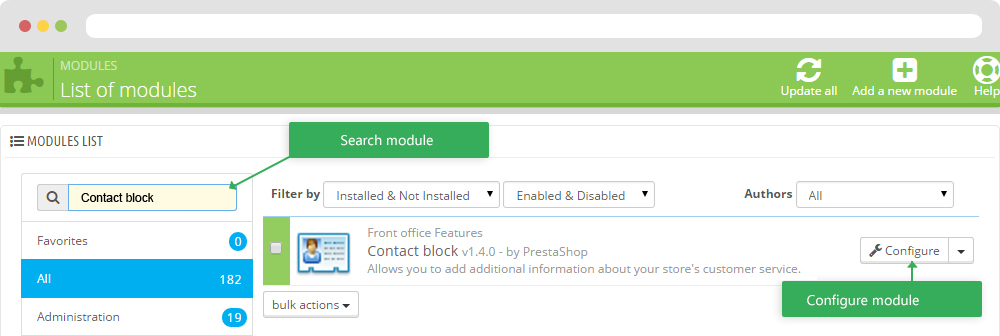
+ You can edit "blocklanguages.tpl" at: \themes\PROJECT_NAME\modules\blockcontact\blockcontact.tpl
2. Display Top
- Front End
- Configure Apollo Page Builder ( Backend > Ap PageBuilder > Ap Profiles Manage --> Select Shop 1 --> View)
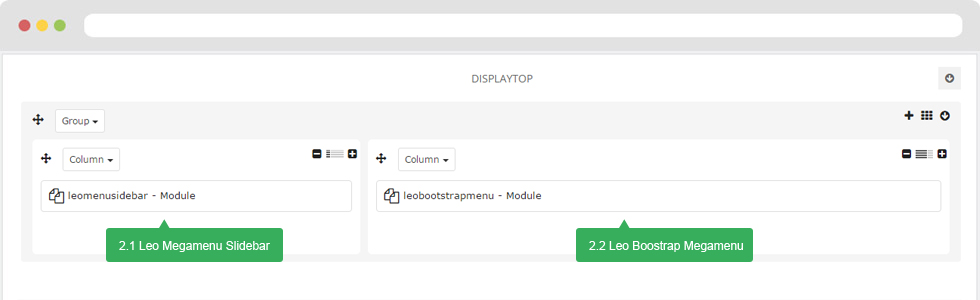
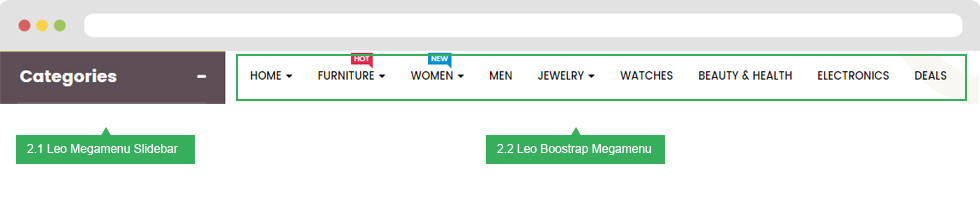
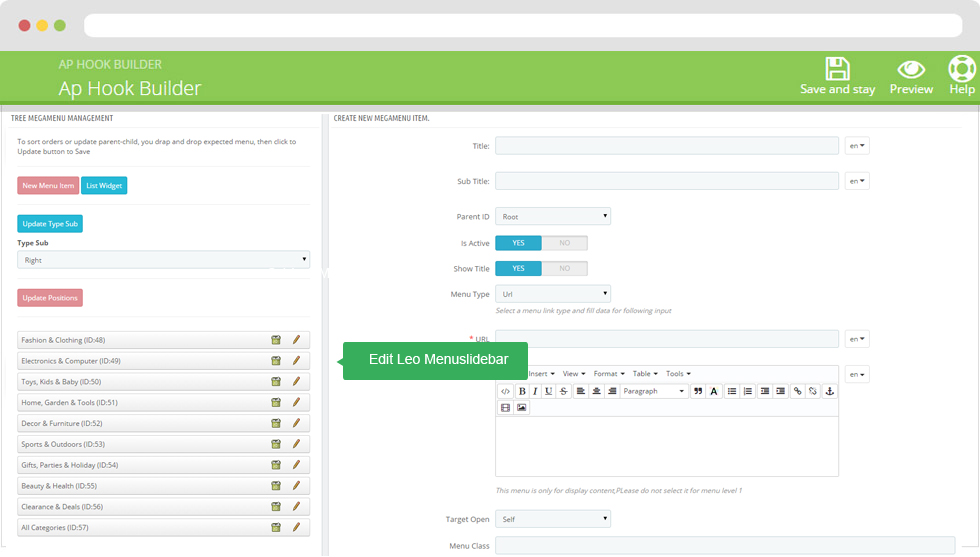
2.1 Leo Menuslidebar
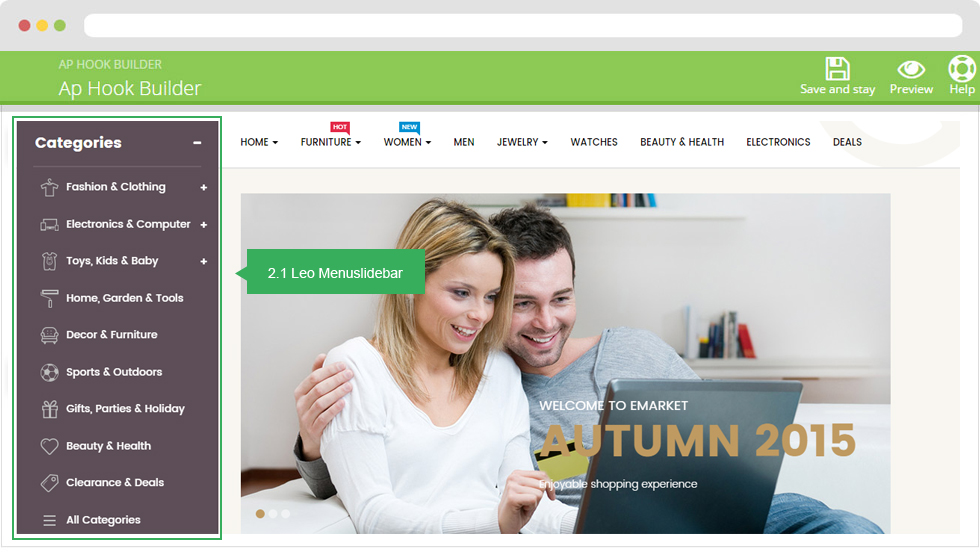
Configure Leo Menusilderbar(Backend > Module > Search Leo Menusliderbar > Config)
2.2 Leo Boostrap Menu
- You can read guide in link (Blog Guide)
- Front end
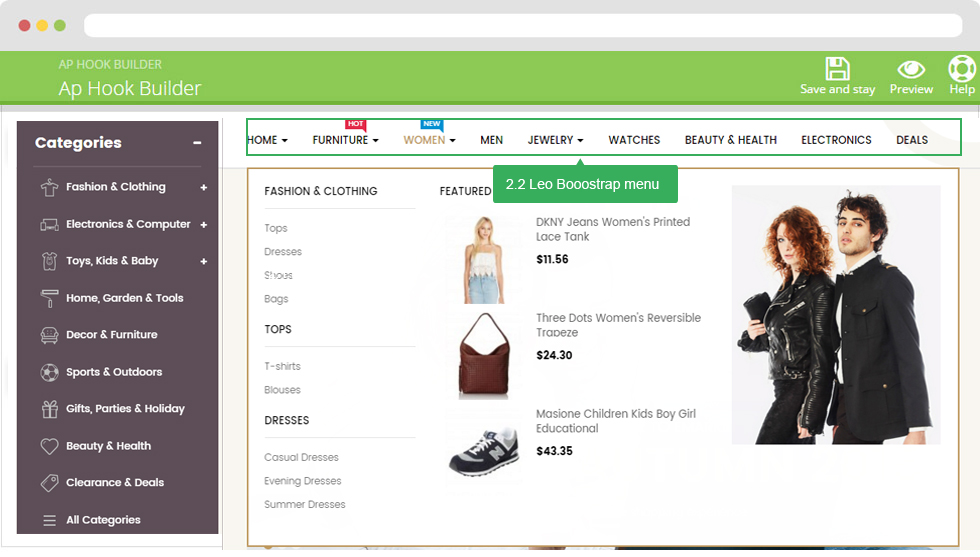
- Configure Block Leo Bootstrap Megamenu(Backend > Modules > Block Leo Bootstrap Megamenu)
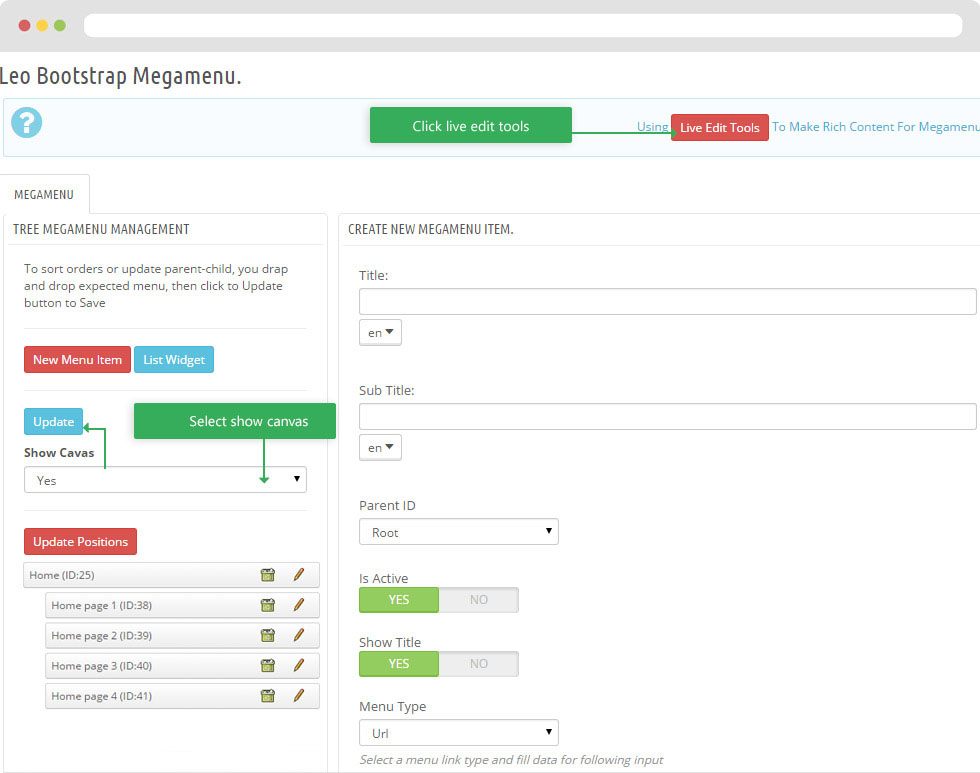
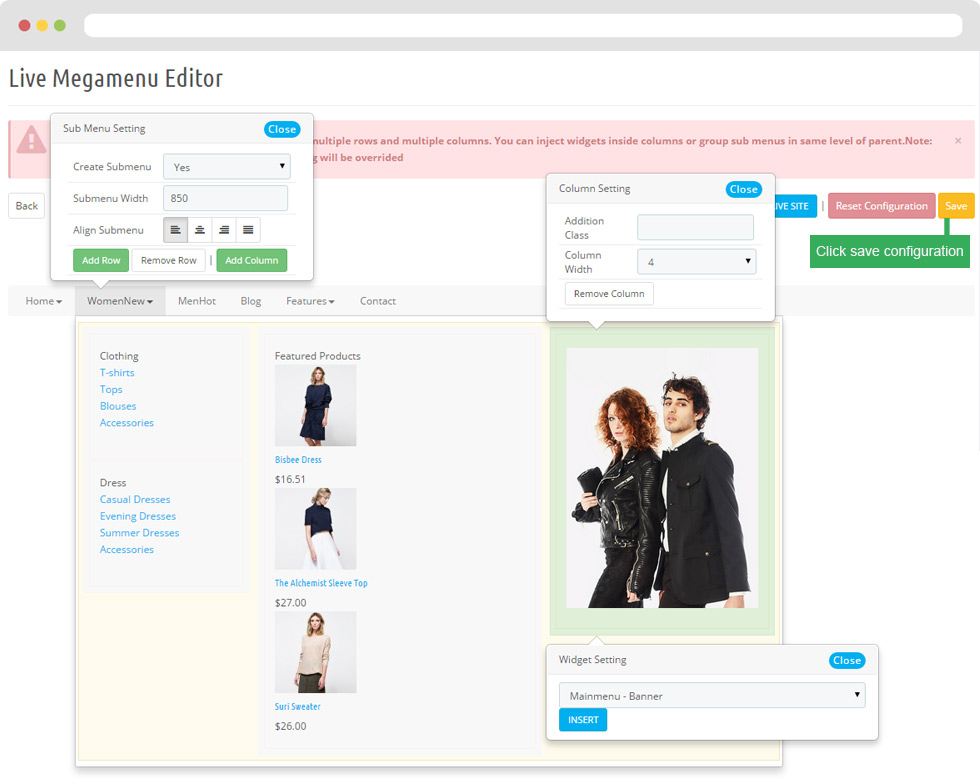
+ You can using "Live Edit Tools" To Make Rich Content For Megamenu
4. DISPLAY HOME
Front End

- Configure Apollo Page Builder ( Backend > Ap PageBuilder > Ap Profiles Manage > Select Shop 1 > View )

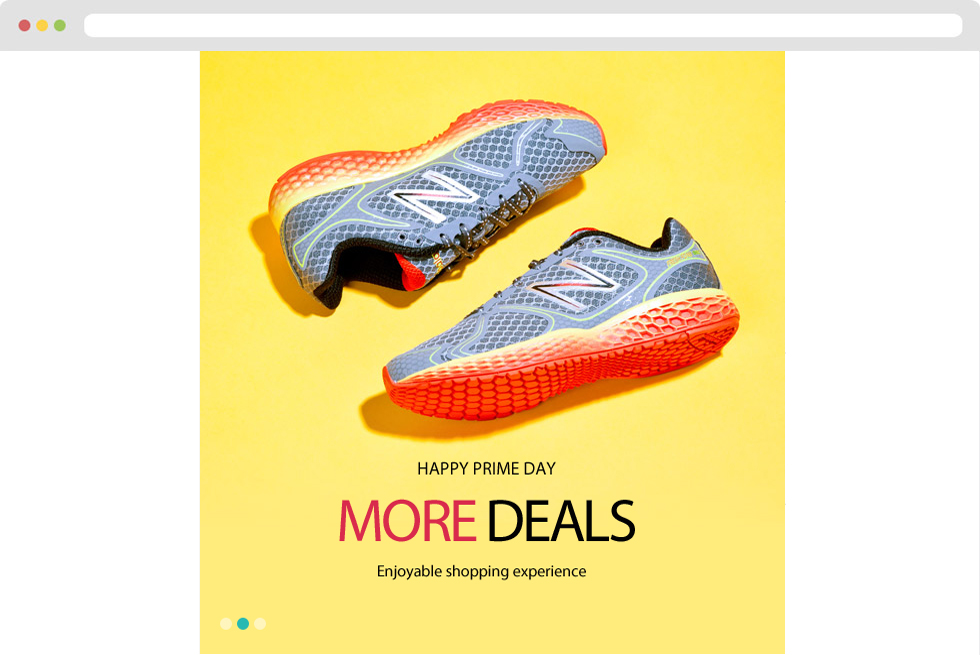
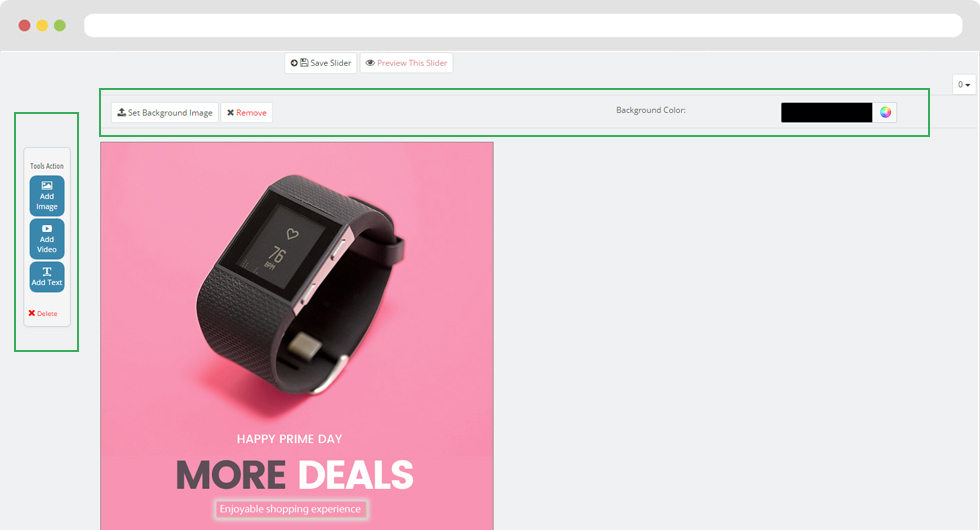
3.2 Slideshow
- Edit Slideshow (Backend > Module > Leo slideshow > Config > Slide Home page 1)
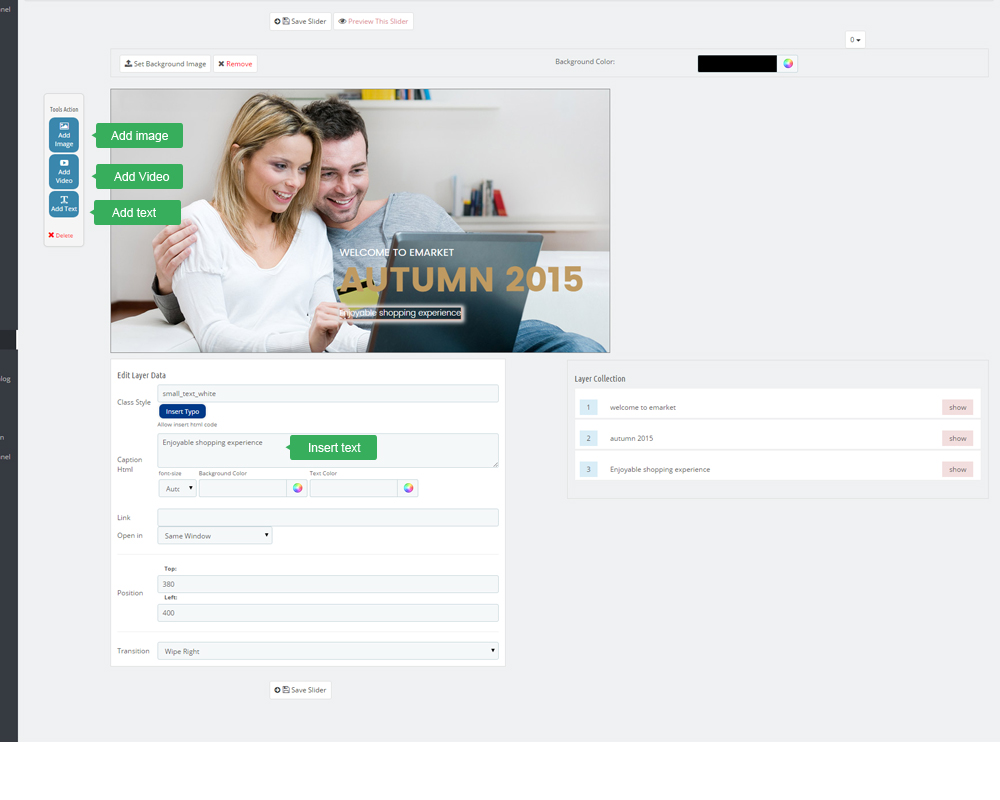
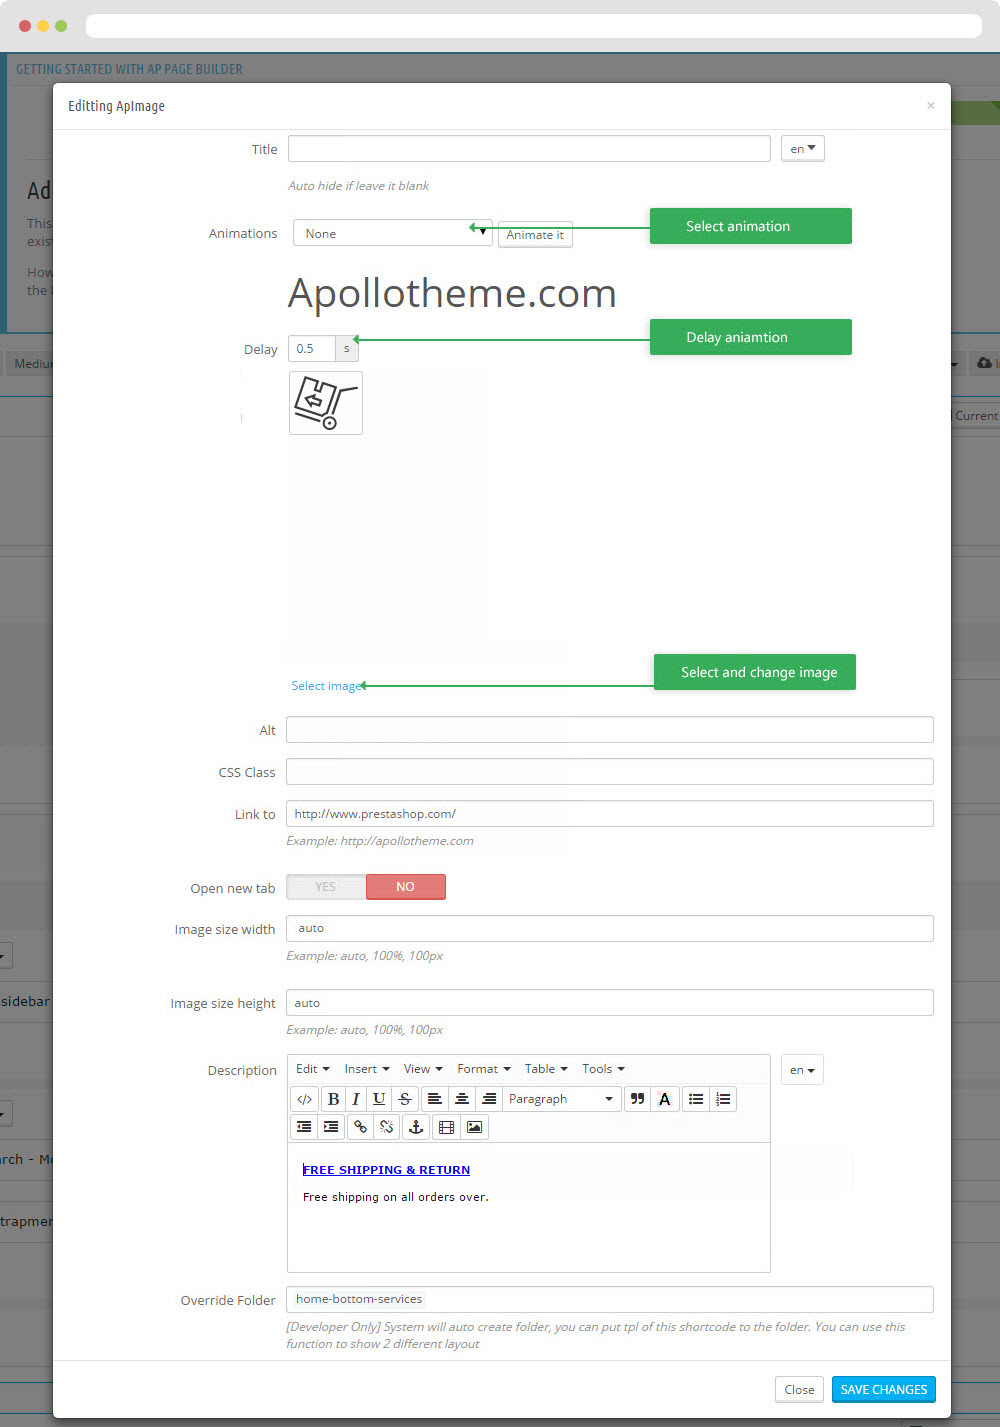
3.2 Slideshow
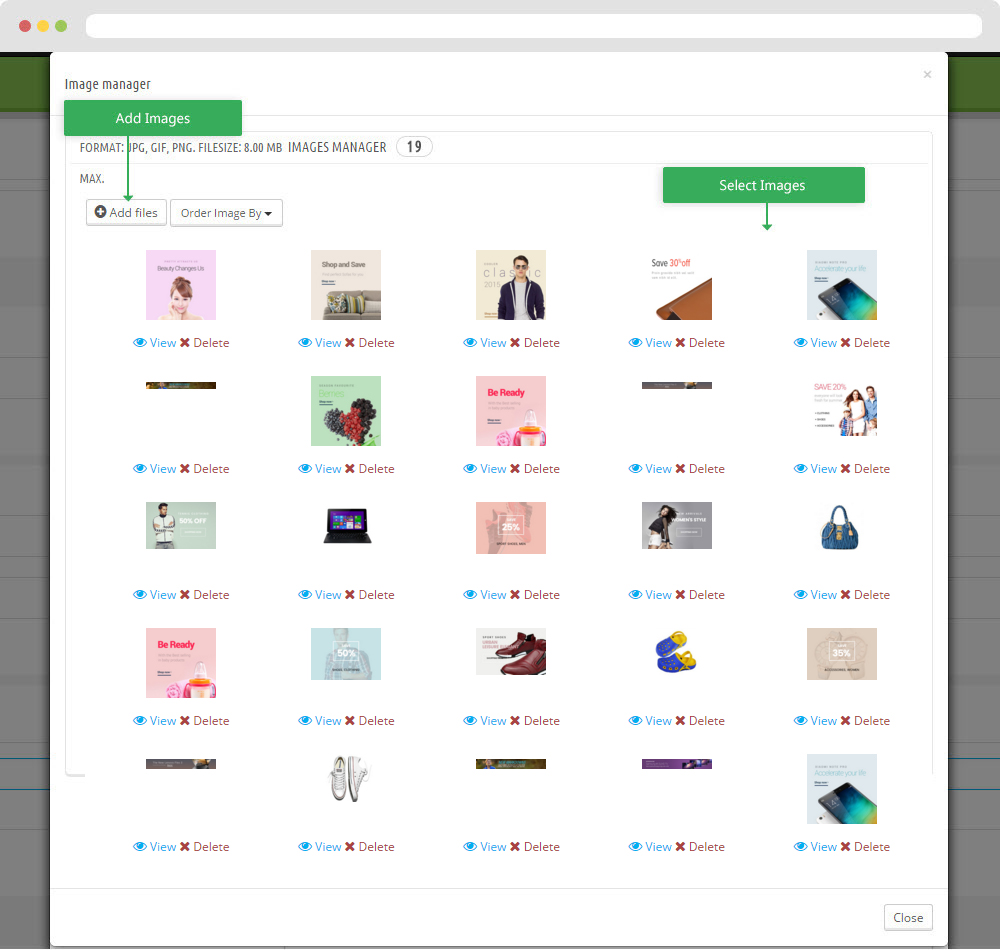
Select change Image
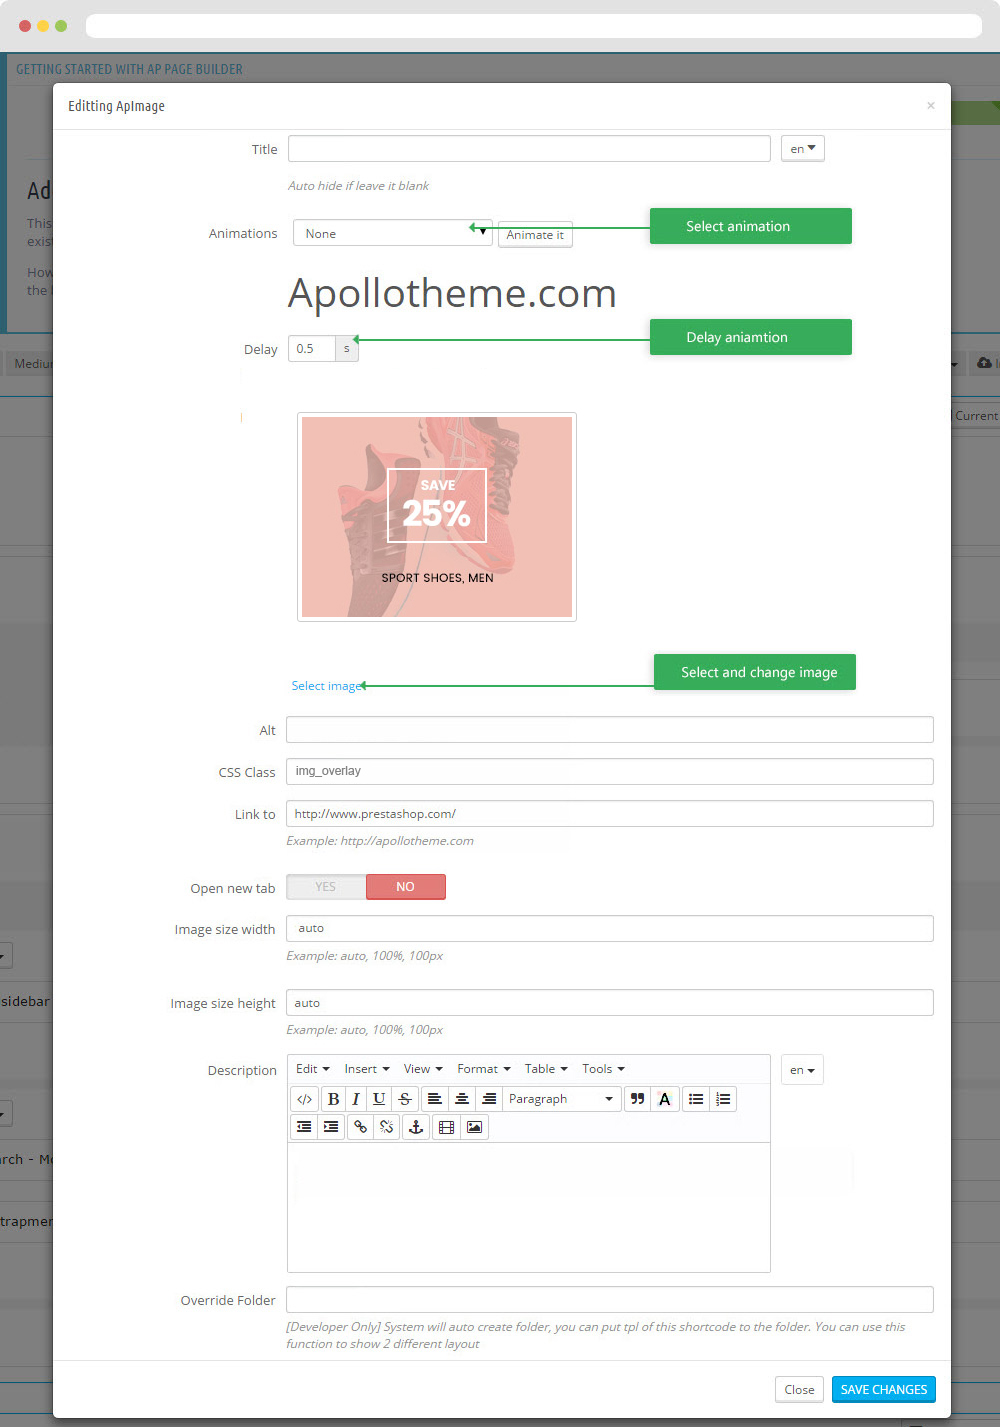
3.3 Widget Image ( Configure Widget Image follow link )
3.4 Widget Image ( Configure Widget Image follow link )
3.5 Widget Image ( Configure Widget Image follow link )
3.6 Widget Image ( Configure Widget Image follow link )
3.10 Widget Image ( Configure Widget Image follow link )
3. 14 Widget Image ( Configure Widget Image follow link )
3.18 Widget Image ( Configure Widget Image follow link )
3.21 Widget Image ( Configure Widget Image follow link )
3.23 Widget Image ( Configure Widget Image follow link )
3.27 Widget Image ( Configure Widget Image follow link )
3.31 Widget Image ( Configure Widget Image follow link )
3.34 Widget Image ( Configure Widget Image follow link )
3.36 Widget Image ( Configure Widget Image follow link )
3.40 Widget Image ( Configure Widget Image follow link )
3.46 Widget Image ( Configure Widget Image follow link )
3.47 Widget Image ( Configure Widget Image follow link )
3.48 Widget Image ( Configure Widget Image follow link )
3.49 Widget Image ( Configure Widget Image follow link )
3.50 Widget Image ( Configure Widget Image follow link )
4.6 Widget HTML
- Code HTML
<div><span>Lorem ipsum dolor sit amet, consectetur adipisicing elit, sed do eiusmod tempor incididunt ut <br />
labore et dolore magna aliqua.</span></div>
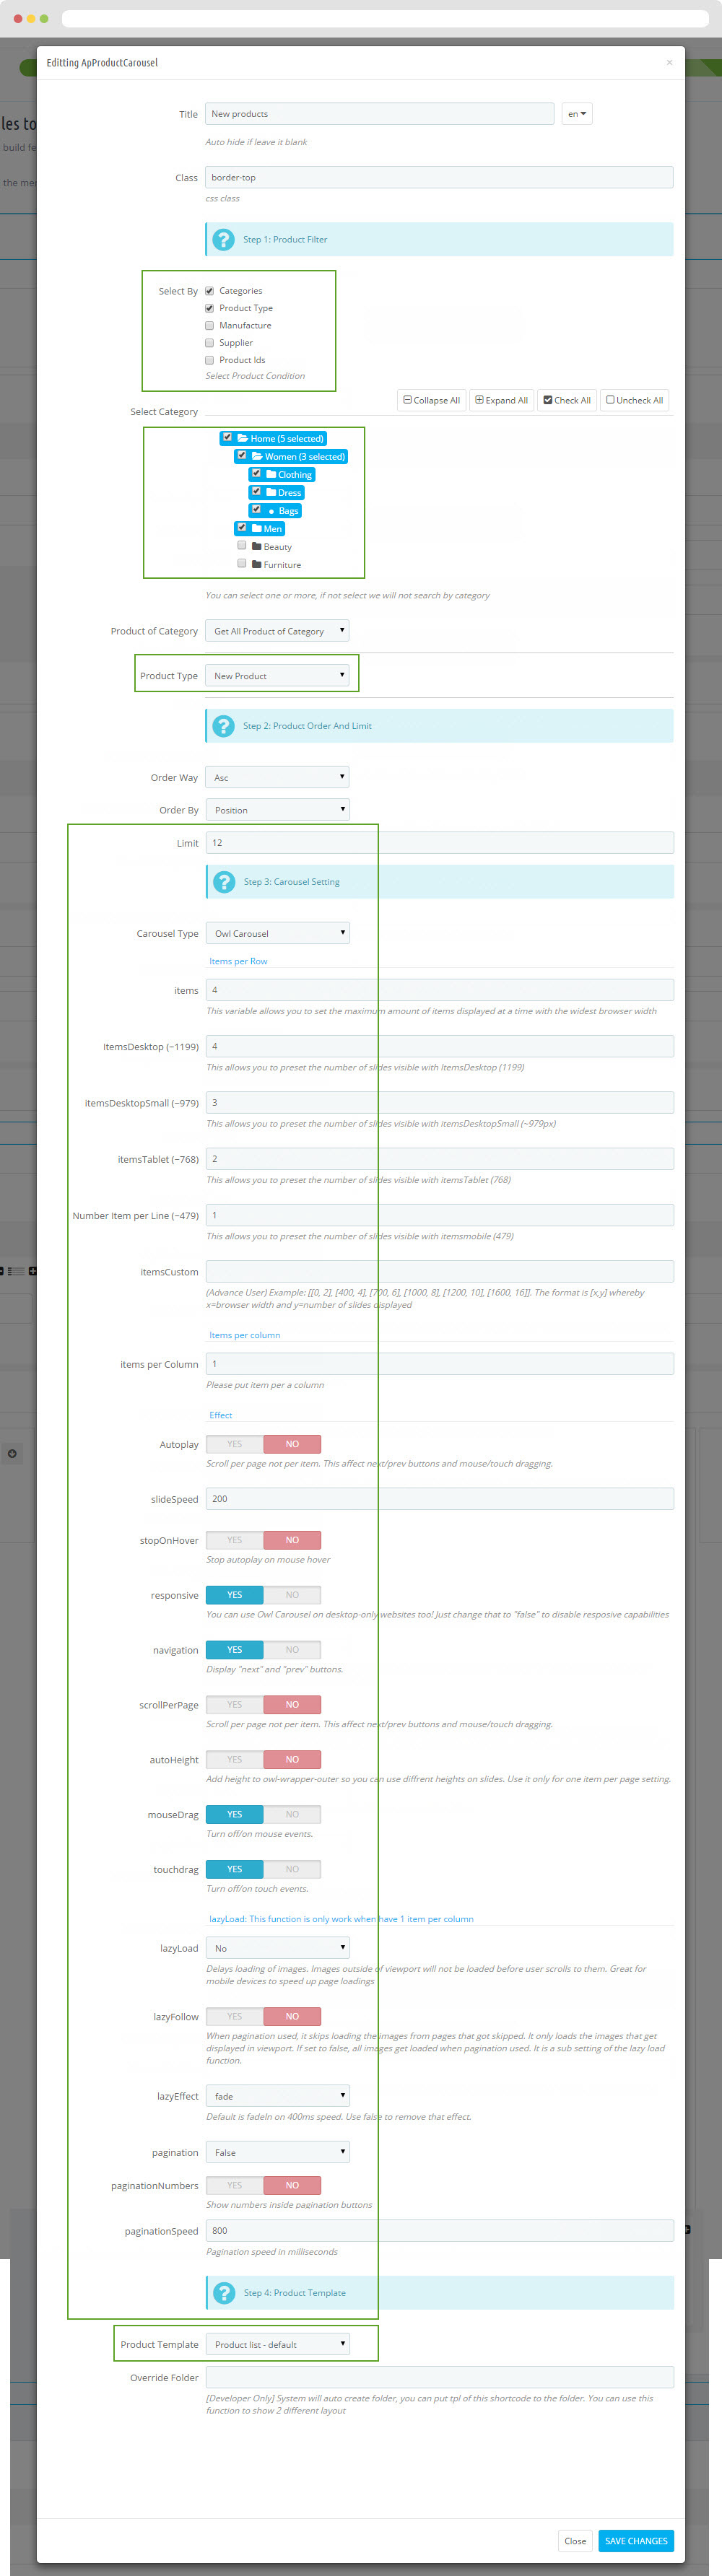
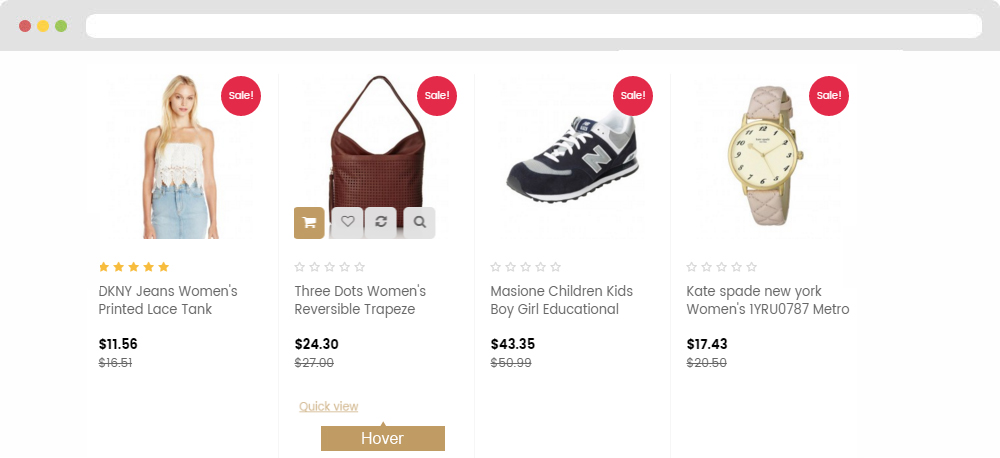
3.7 , 3.11 , 3.15 , 3.19 , 3.24 , 3.28 , 3.32 , 3.37 , 3.41 Widget Product Carousel
- Edit Widget Product Carousel
3.46 , 3.47, 3.48, 3.49, 3.50 Widget Image
- Code HTML
<div class="fbox-body">
<h4>Worldwide Delivery</h4>
<p>With sites in 5 languages, we ship to over 200 countries & regions.</p></div>
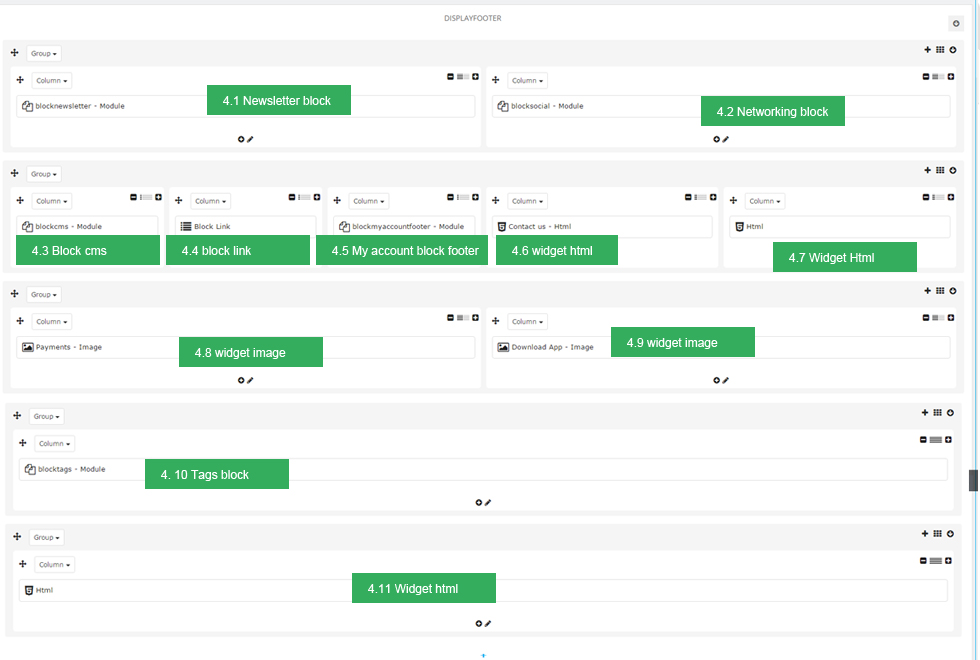
5. Display Footer
- Front End
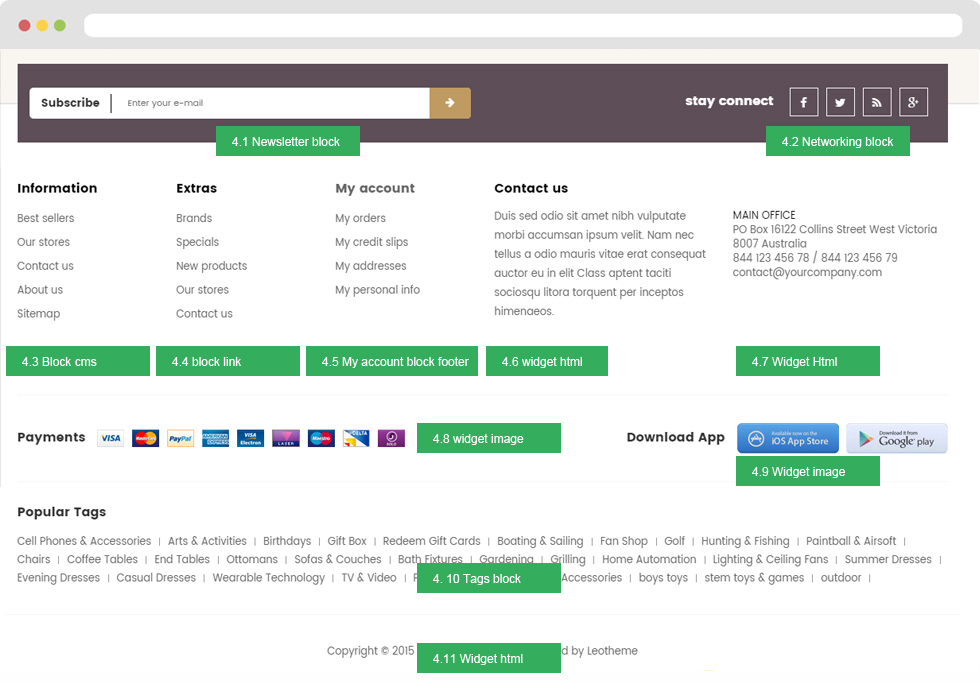
- Configure Apollo Page Builder ( Backend > Ap PageBuilder > Ap Profiles Manage > Select Shop 1 > View )
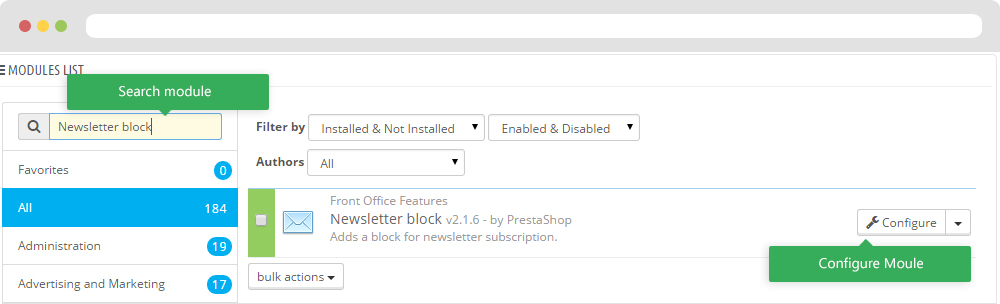
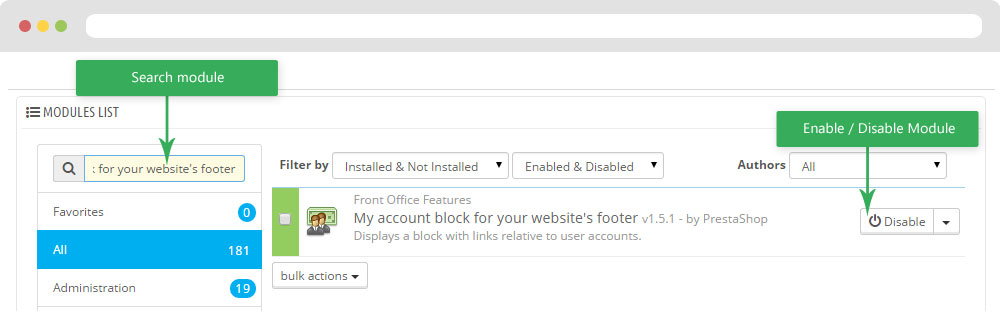
- Configure module (Backend > Modules > Newsletter block)
- You can configure enable/disable module
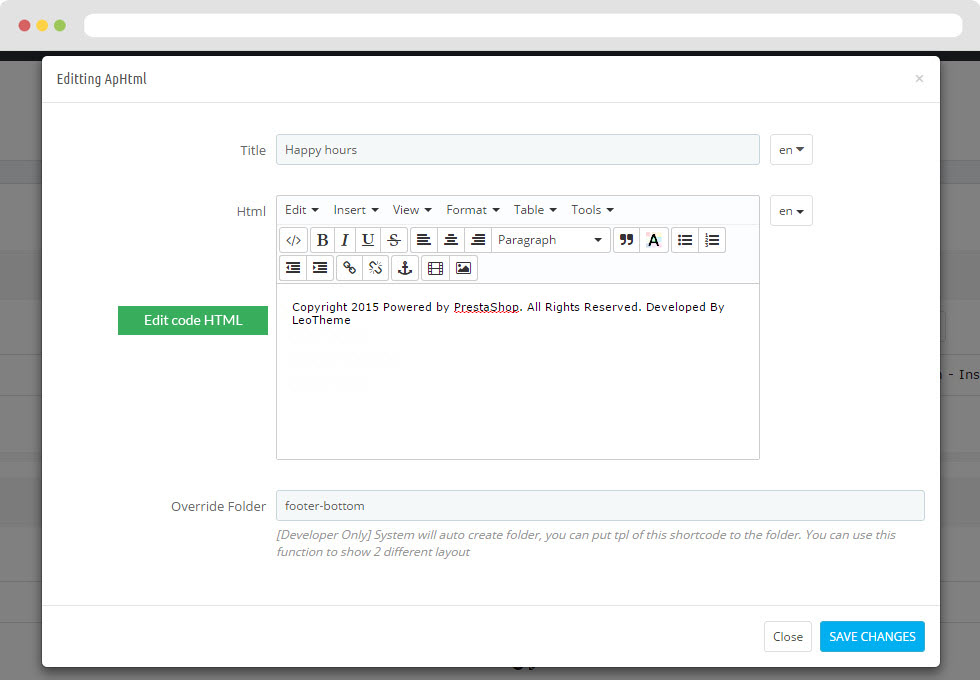
- Edit Widget HTML
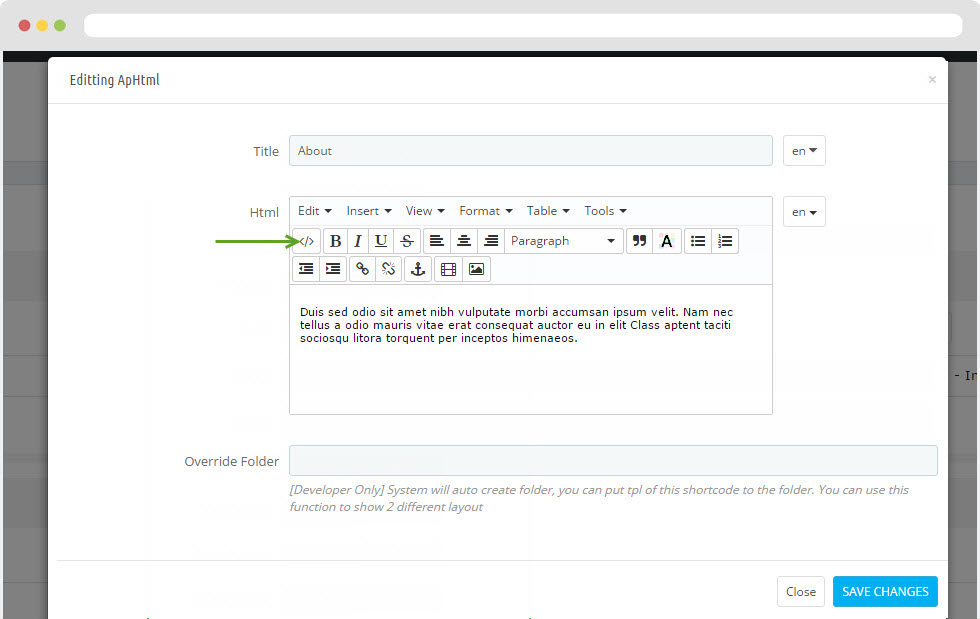
- Code HTML
<p>Duis sed odio sit amet nibh vulputate morbi accumsan ipsum velit. Nam nec tellus a odio mauris
vitae erat consequat auctor eu in elit Class aptent taciti sociosqu litora torquent per inceptos himenaeos.</p>
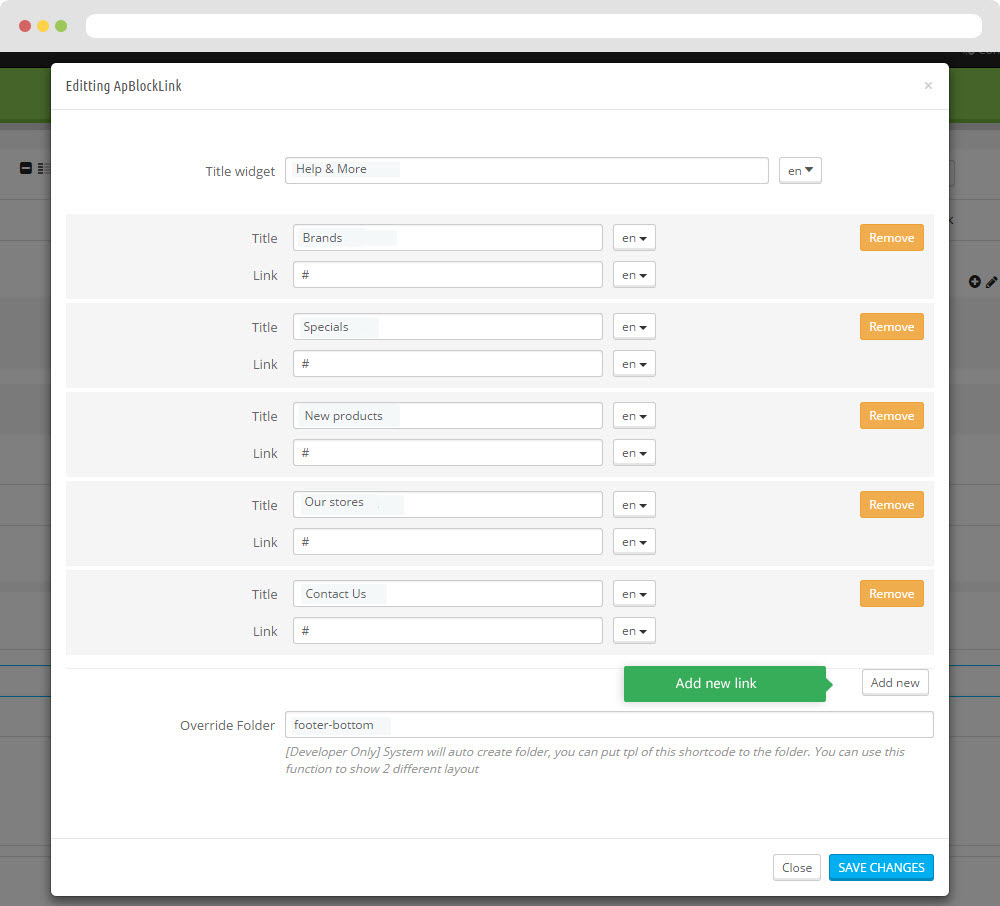
+ You can edit "blockmyaccountfooter.tpl" at: \themes\THEME_NAME\modules\blockmyaccountfooter\blockmyaccountfooter.tpl
- Edit Widget HTML
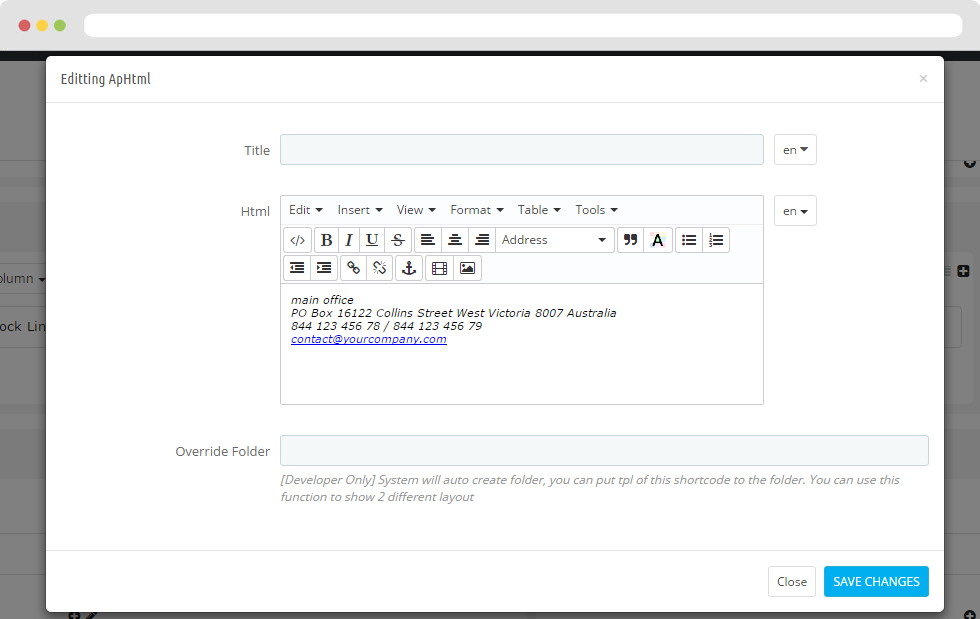
- Code HTML
<ul class="contact-us">
<li><em class="fa fa-map-marker"> </em>PO Box 16122 Collins Street West <br /> Victoria 8007 Australia</li>
<li><em class="fa fa-phone"> </em> (00) 123 456 789 <br /> (00) 123 456 789</li>
<li><em class="fa fa-envelope"> </em> <a href="mailto:contac@yourcompany.com">contac@yourcompany.com</a></li>
</ul>
- Edit Widget HTML
- Code HTML
<div class="text-center footer-copyright"><span class="copyright">Copyright 2015 Powered by PrestaShop.
All Rights Reserved. Developed By</span> <span class="text"> LeoTheme</span></div>
- Edit Widget Image

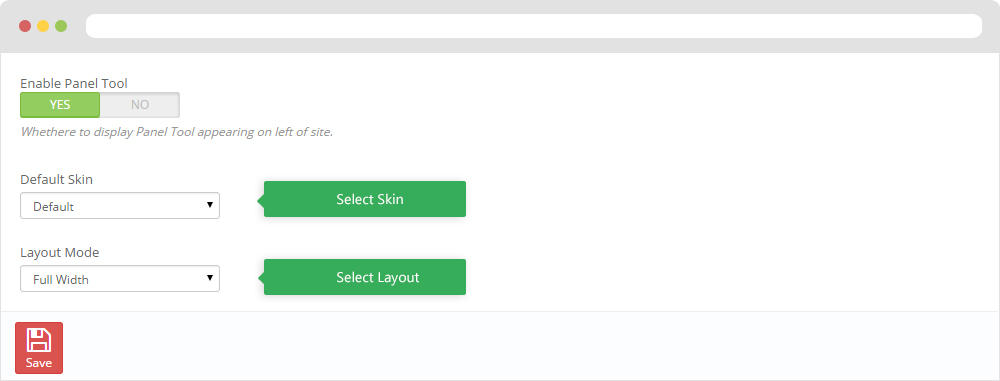
6. Tool bar
- Front End
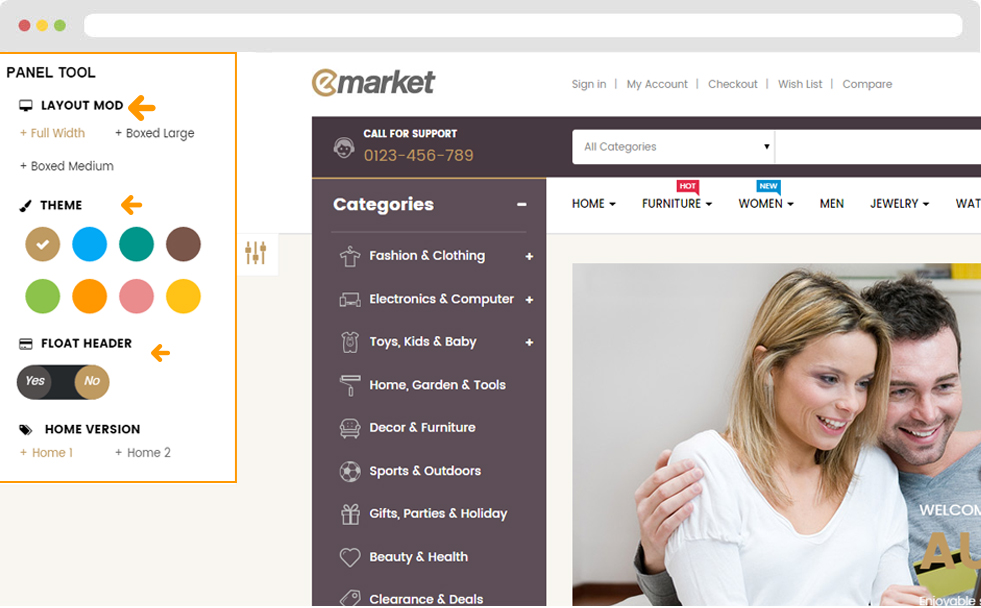
- Configure Tool bar(Backend > Modules > Leo Theme Control Panel)
Ap PageBuilder
You can read guide in link (Blog Guide)
1. Profile Manage (Backend > AP PageBuilder > Ap Profile Manage)
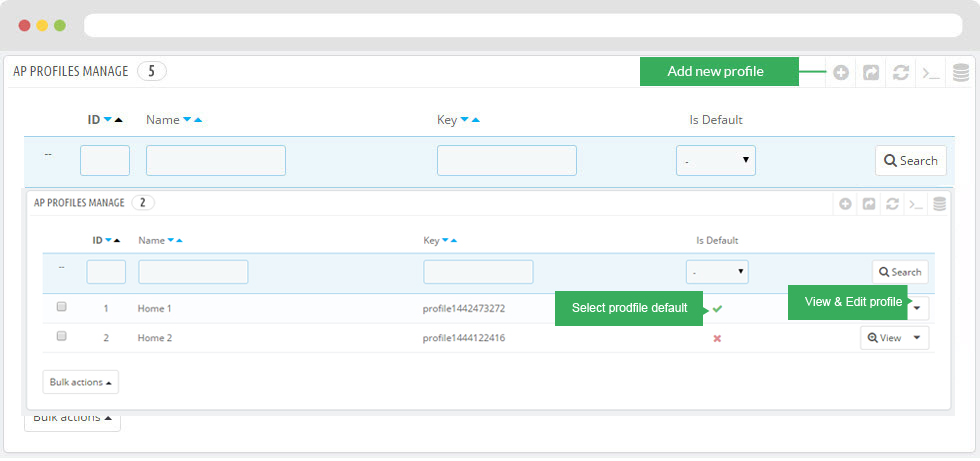
1.1 View and Edit Profile
![]()
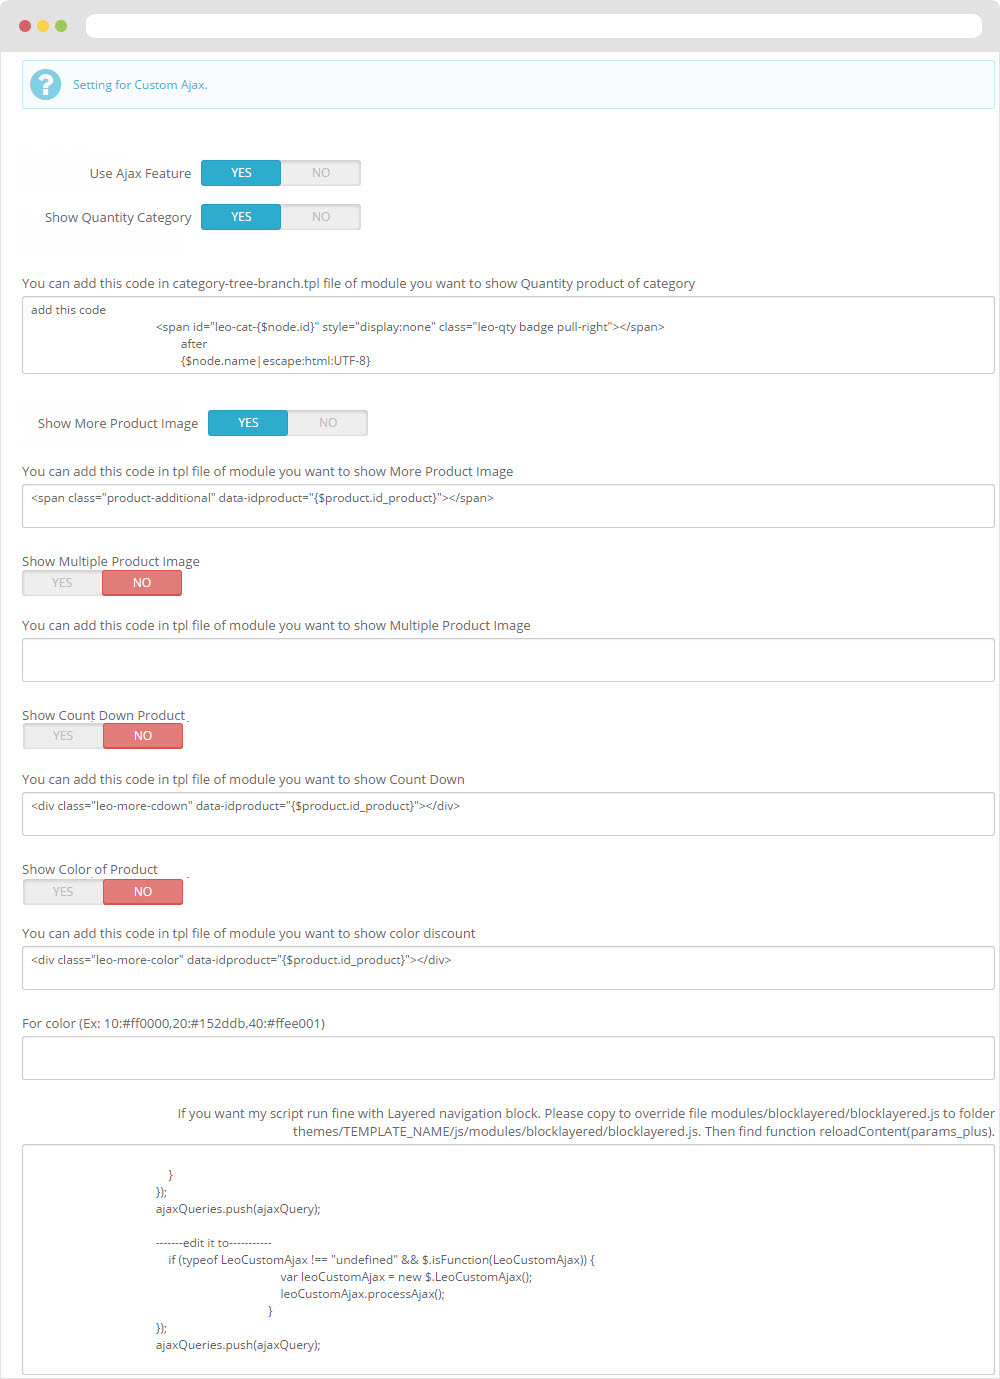
2. Custom Ajax
Front end
Configure Custom Ajax ( Backend > Modules > AP PageBuilder > Configure )
Manager Profile for shop 2
1. Leo Slide show
Front-office Appearance
1.1 Configure Leo Slide show Back Office > Modules > Install and Configuration Leo Slideshow > Select edit Slideshow shop 2
2. Layout struct Front end
2.1 Configure Profile shop 2 ( Backend > Ap PageBuilder > Ap Profiles Manage > Select Shop 2 > View )
Translations
10. Front-office translations(Backend > Localization > Translations)
![]()
10.1. Installed modules translations(Backend > Localization > Translations)
![]()
Information
Thank you for reading!
We hope you can create the best website with our themes.
Getting Support
If you are unable to find your answer here in our documentation, please go to our forum and post up a new topic with all the details we need. Please be sure to include your site URL as well or send us an email.
- Forum
- Ticket
- Contact us
- Email: leotheme@gmail.com
- Skype Support: trandinhnghiait
- YouTube
Our support scope
Our support covers configuration, building site as demo, trouble using any features, and bug fixes. We don't provide support for customizations or 3rd party extension.
Our support time
We try our best to monitor the email around the clock, however, this is not always possible due to different time zones. We will try to reply you as fast as we can.
Our working time is 8.00 AM - 5.30 PM, Monday to Friday (GMT+7). So if ask for help in the weekend, you may have to wait a little bit for support and please be patient.